
Whenever you are done developing a Web Application, the next step is do a final review of the business requirements, perform throughout Quality Assurance Testing and then get ready to Launch it to Production.
A Node.js Application can be launched in multiple ways, the most popular two choices for 2022 being Containerized and Serverless Deployments.
Conversely, the two types of deployments can be very difficult to understand whenever you're starting out learning how to Deploy a Web Application to Production, with many hidden layers of Networking which are abstract to a Developer.
Therefore, in this article we will choose to explore a simple, yet very good, method to Deploy your Node.js Application to Production.
Initial setup
In order to begin, you will need the following prerequisites:
An Amazon Web Services Account, which must have a credit card attached to it and be verified. You may refer to this guide on how to do it: https://aws.amazon.com/premiumsupport/knowledge-center/create-and-activate-aws-account/
Clone the following Repository from GitHub: https://github.com/Pro-Application-Tech/node-js-on-aws (this repository is the actually the same code base that we created in our Simple Authentication Using JWT (Node.js/Express) article that we added some files to, as presented in the next sections)
You will need to install an FTP Client, such as FileZilla (Windows, Linux & Mac) or Cyberduck (Windows & Mac). For this tutorial we will be using Cyberduck.
(Optional) You have purchased a Domain which you'd like to associate with your Web Application. This step is optional, but it is very likely that you want to do this. If you are not sure where to start with purchasing a domain, we recommend using Namecheap.
If you don't have an AWS Account yet, it will take you up to 1-2 business days to create one and have it Validated by Amazon.
Given that 2 days is a very long time, and you are here now for our article, we have included screenshots for the steps that we are taking on the AWS Console, starting with the first page you land on after signing in.
Setting up the AWS EC2 Instance
In this section we want to:
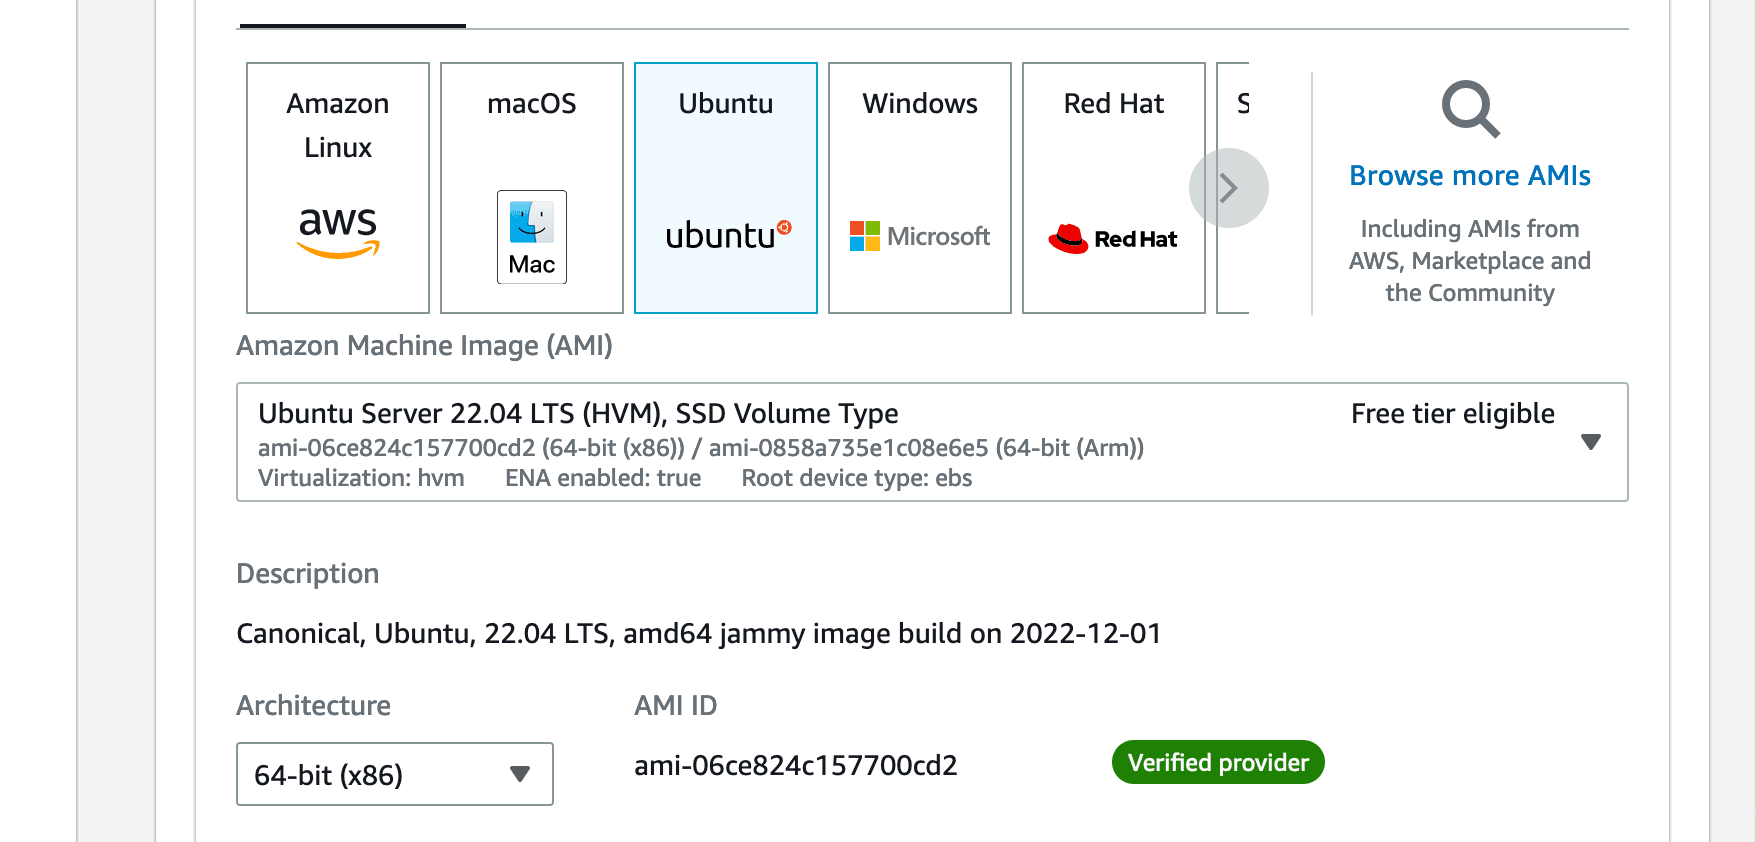
create an instance on AWS EC2, using mostly default security settings (our instance will be using Ubuntu as the operating system)
assign an Elastic IP address to the instance, so that the IP address is static (it does not change when the server restarts)
connect to the instance using SSH (with a Terminal on Mac & Linux or GitBash on Windows)
install Node.js, MongoDB and Nginx on the instance
configure Cyberduck and MongoDB Compass to connect to the instance
Let's begin
Once you sign in to the Amazon Web Services, you will land on the AWS Management Console dashboard.
Here, we will need to tap into the search field and type "ec2".
Searching for the EC2 Service:
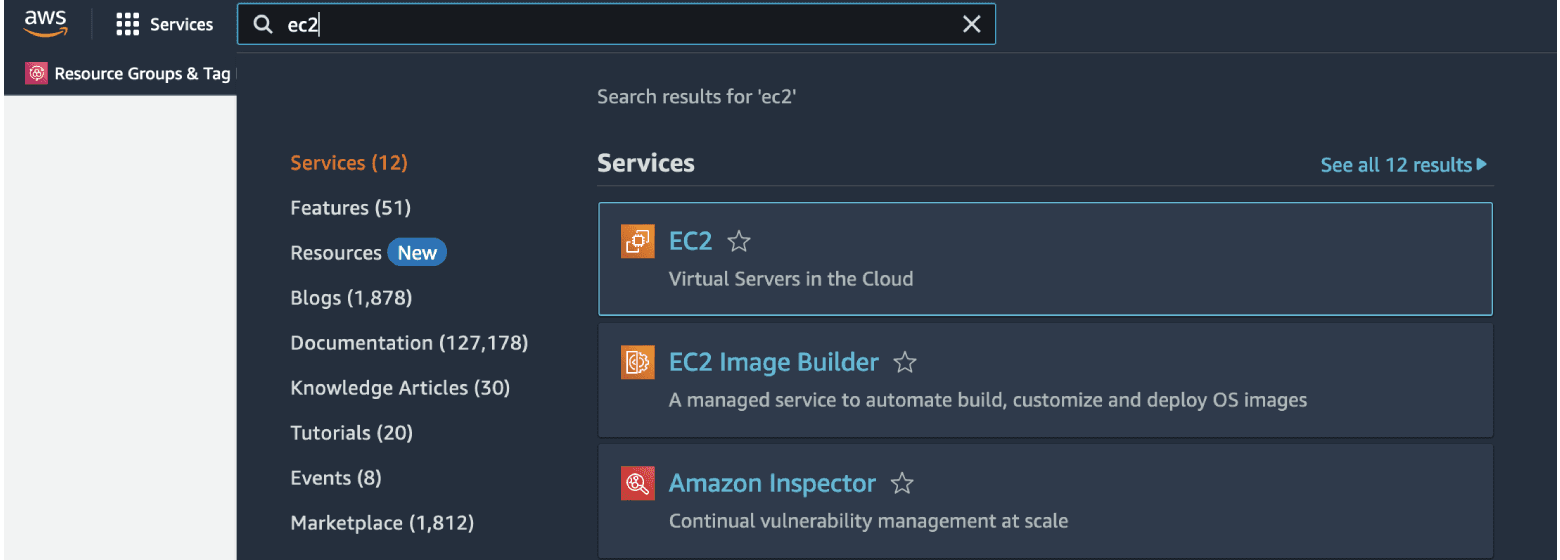
And we will select "EC2".
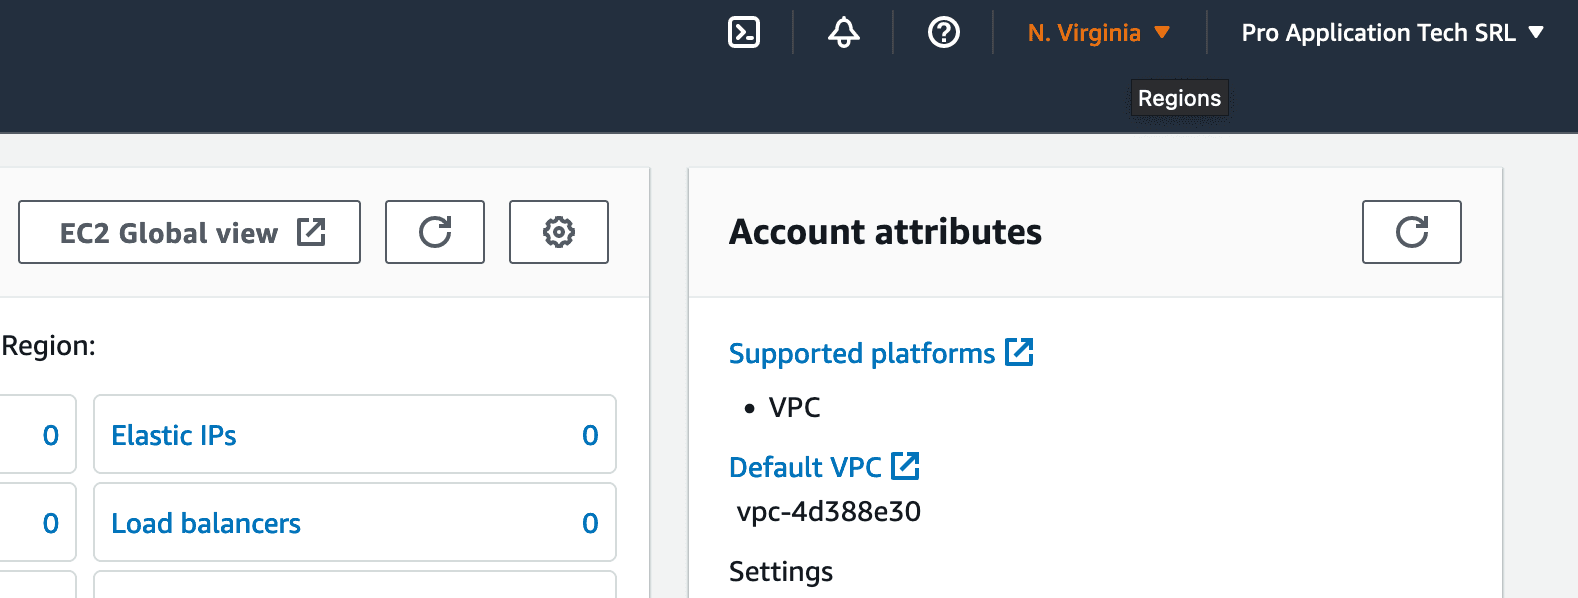
Once the next page is loaded, we will need to ensure that we are working on the correct AWS Region, as, by default, "US East (N. Virginia)" may be selected, and if your website is targeted towards European clients, then the distance will add to latency, making requests to the API slower.
On the top right of the page you will find the following buttons, of which we're interested in the Regions dropdown.
The Choose Region Dropdown:
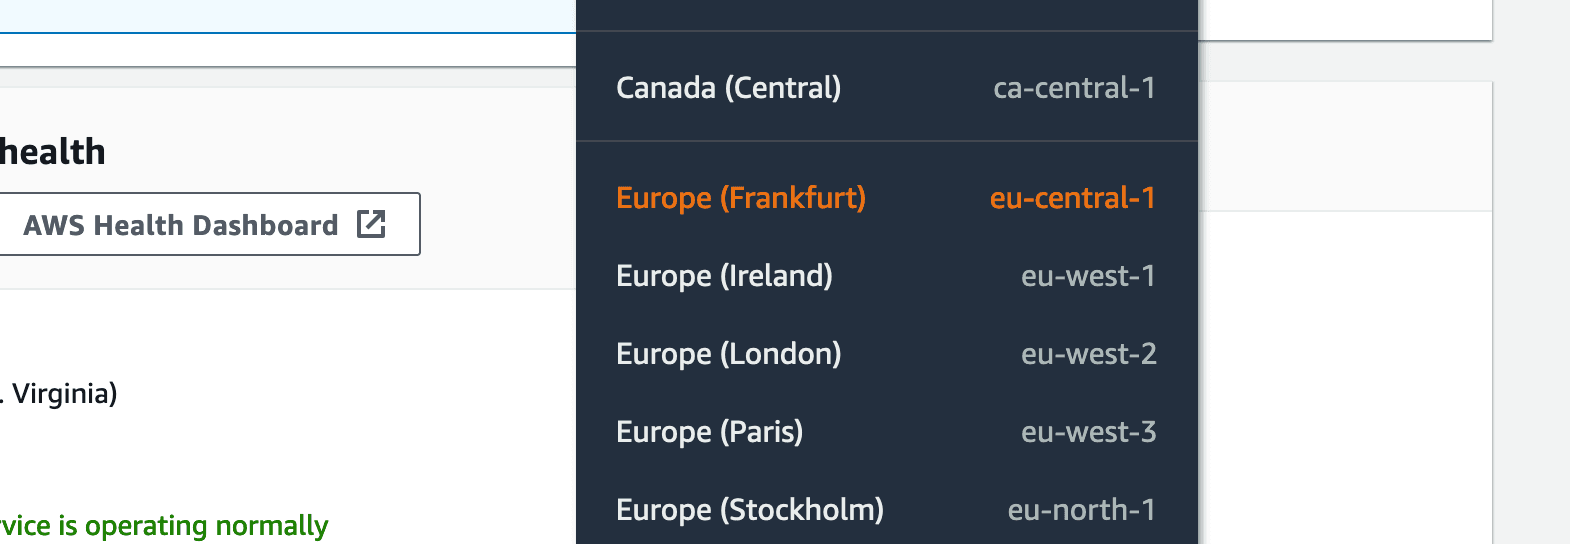
Then you need to look for the region you want to choose. The data center in "Frankfurt" is closest to almost all countries in Central and Eastern Europe, therefore we will choose this one for the tutorial.
Choosing the Closest Region:
Once the page is done loading, we are going to press "Launch instance".
Beginning the Launch instance process:

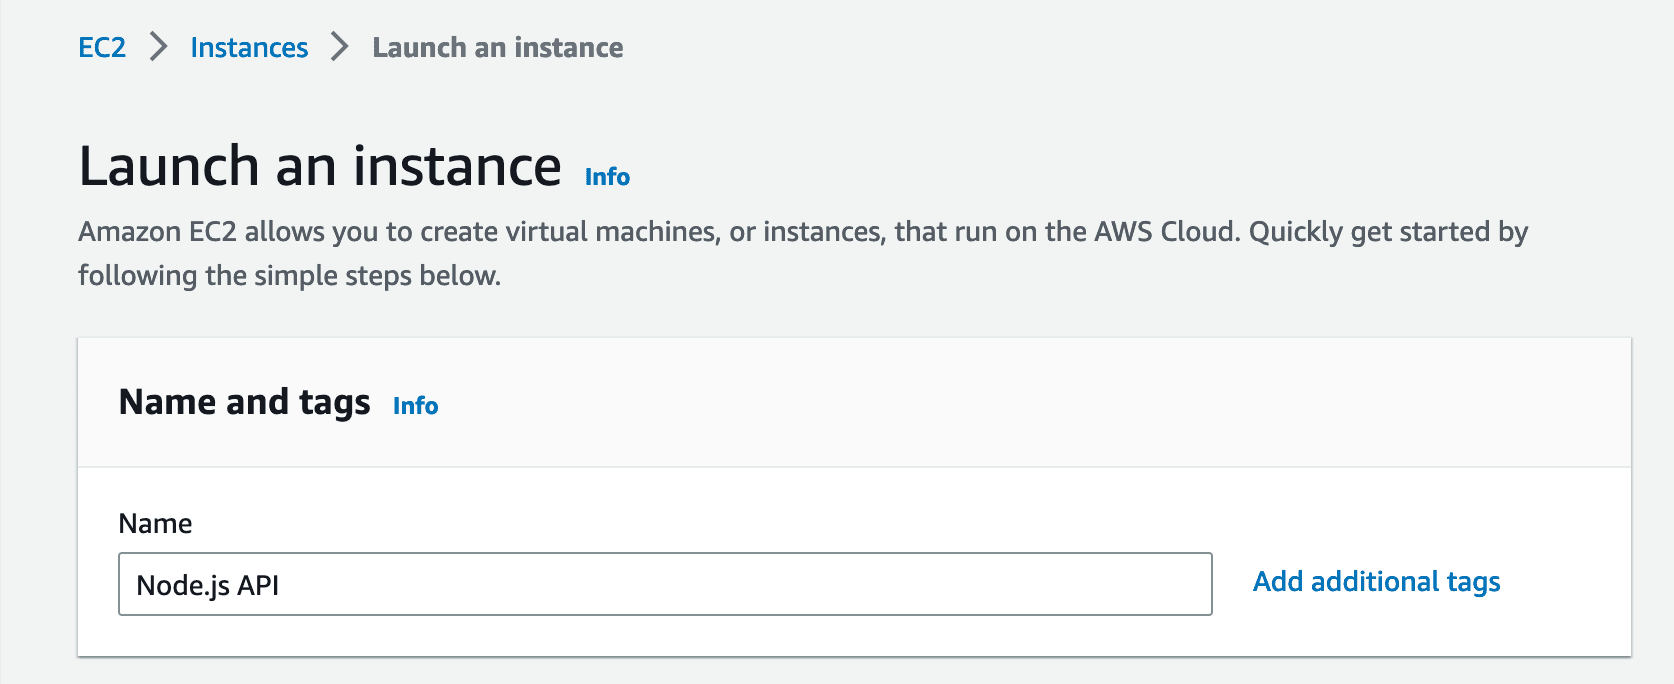
Give the Instance a name:
Choose Ubuntu as the Operating System:
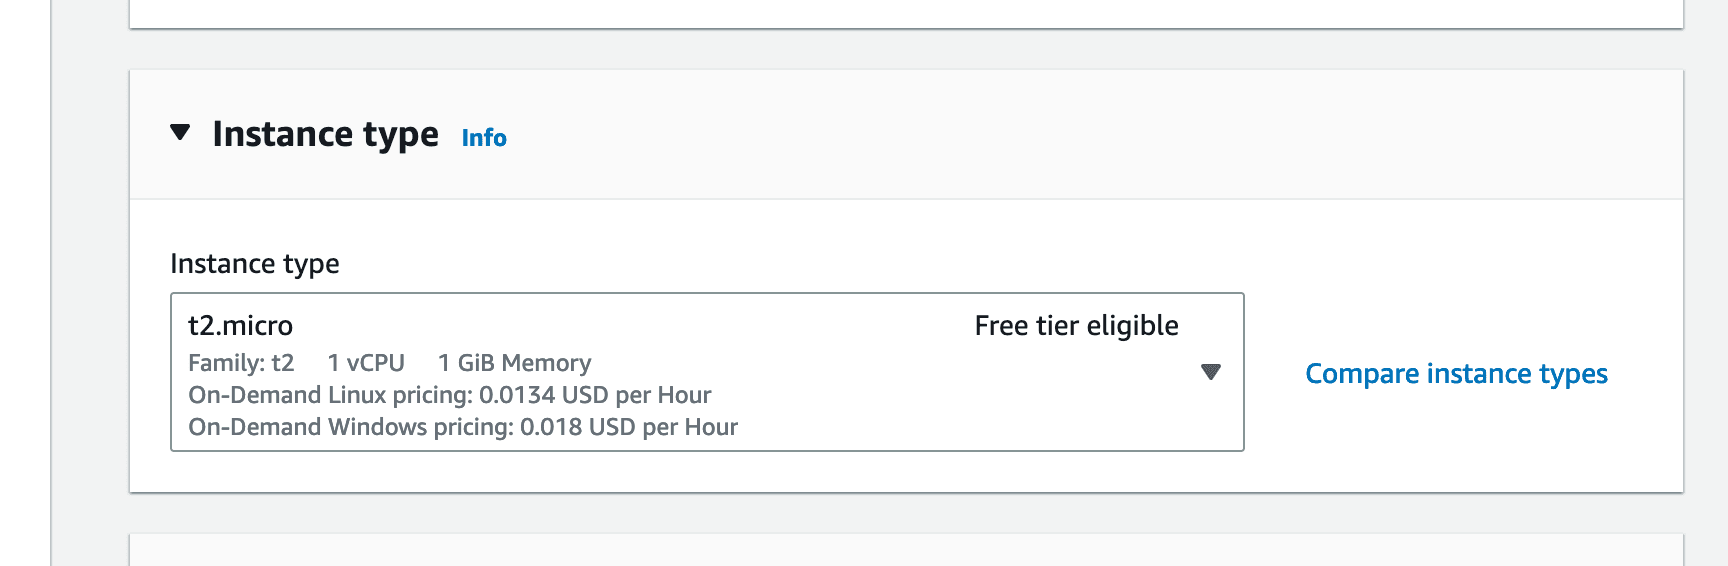
Leave the instance type as default, "t2.micro" (which is free under the Free Tier limits):
Next we will need to create a "Key pair". The Key pair will be a file which you need to awalys keep secure and never share it with anyone you don't have to have Administrator access to your instance.
Do not place the Key pair in: your GitHub repository, a public folder or file storage or any place where unauthorized people may be able to have access to your key.
Creating a new Key pair: (click "Create new key pair")
![]()
Give the key pair a name, and then click "Create key pair":
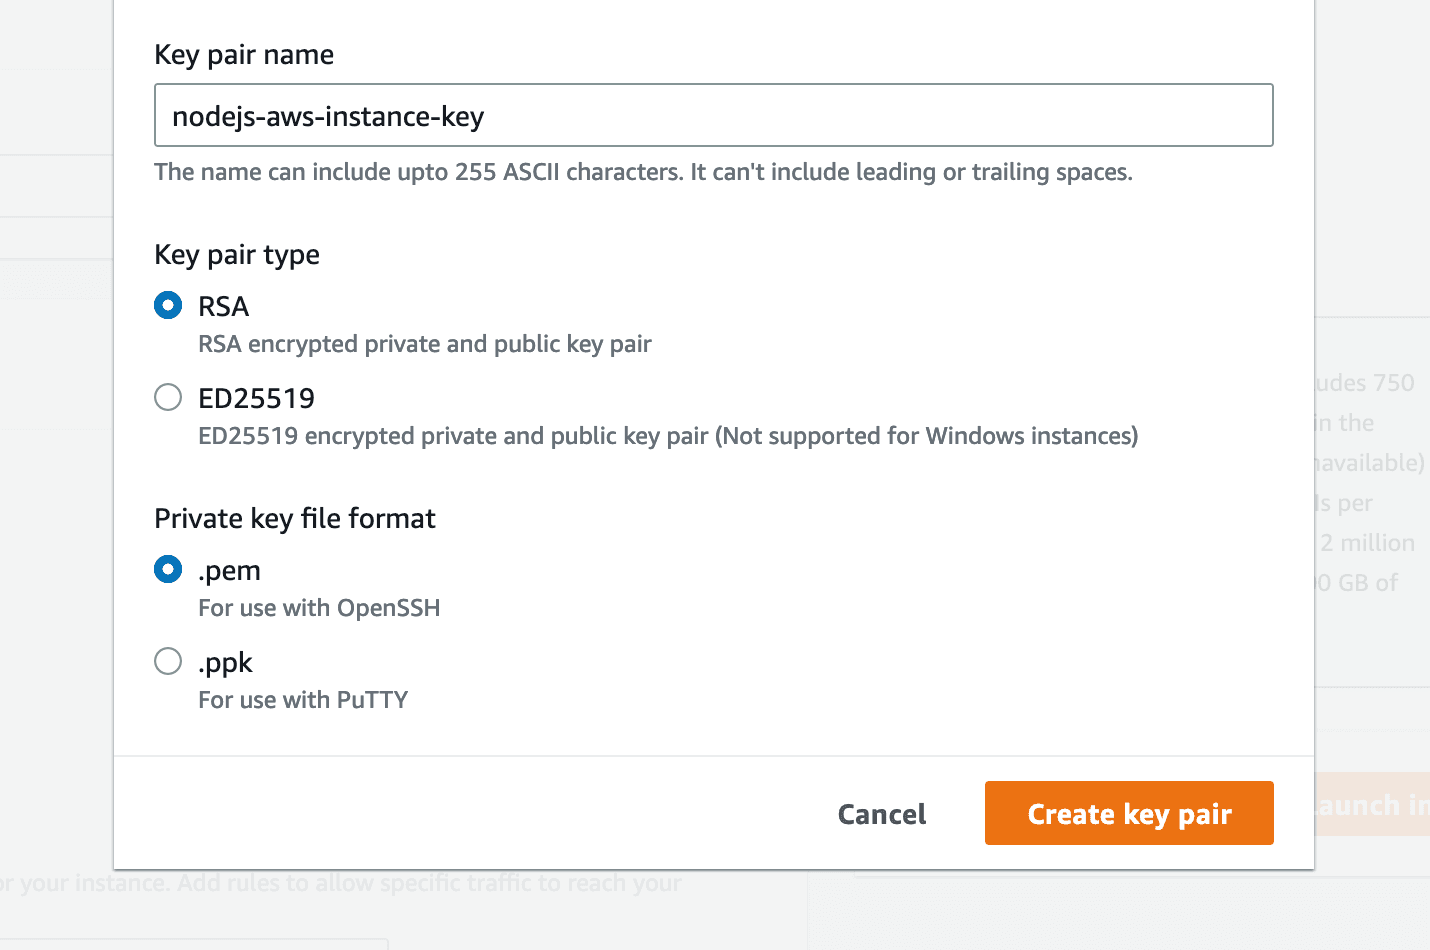
The Key pair will be automatically downloaded once you press "Create key pair", make sure to store it safely.
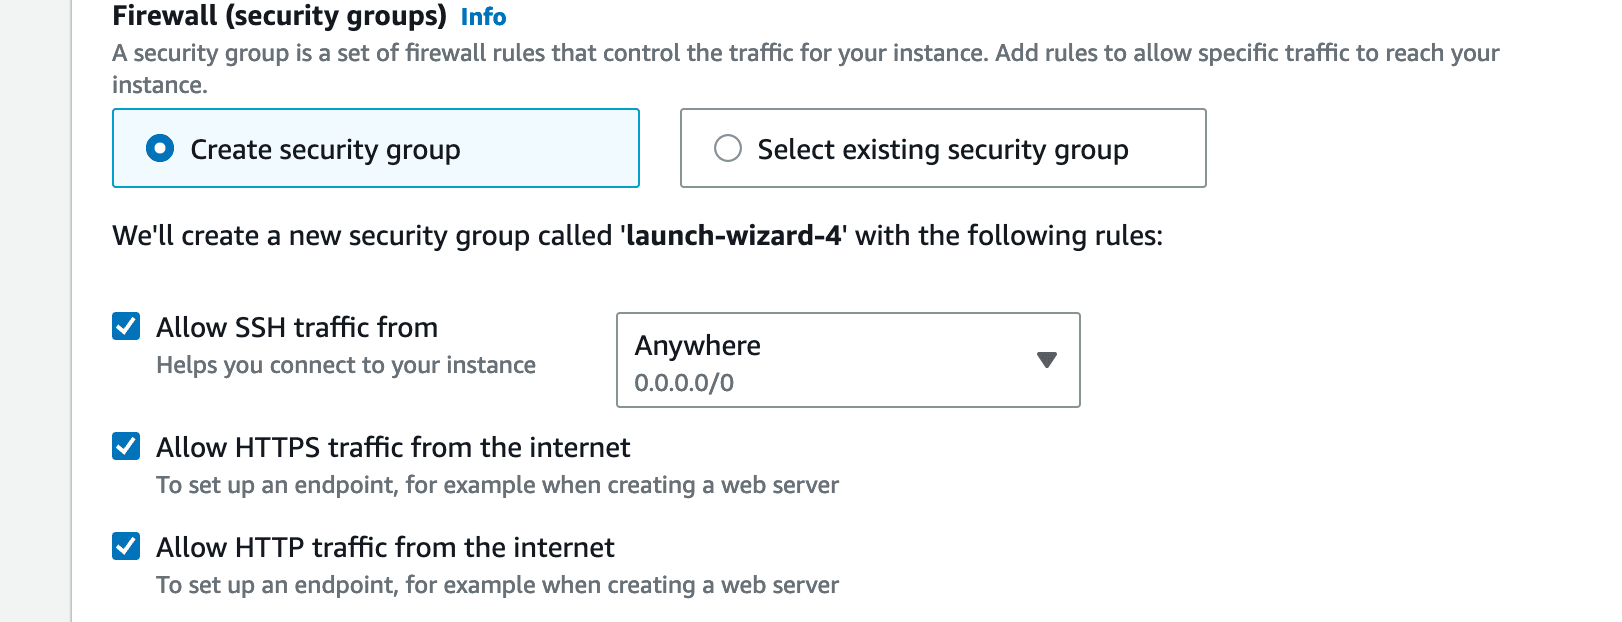
Enable SSH, HTTP and HTTPS Access:
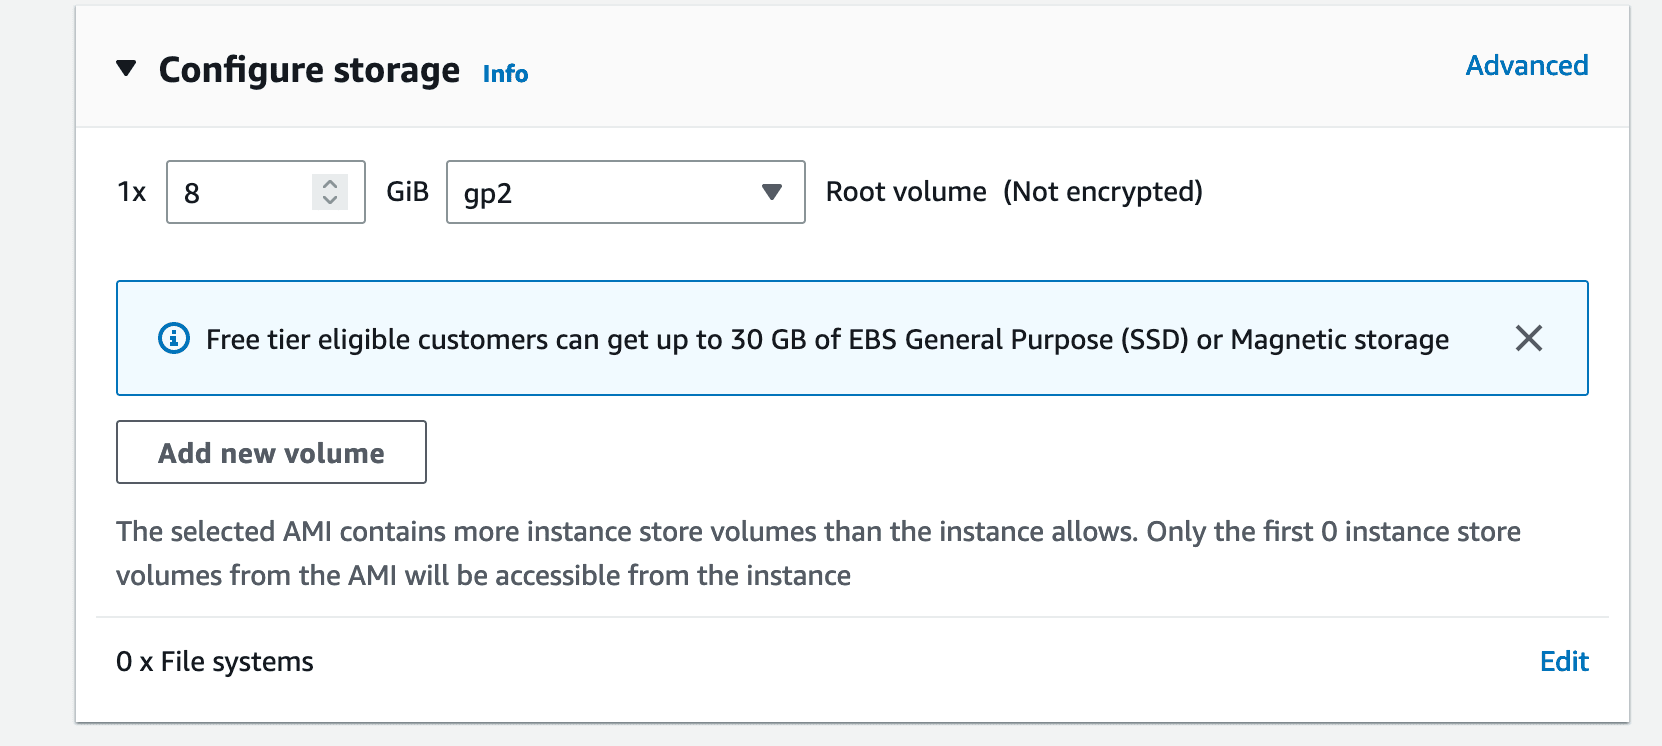
Storage settings remain unchanged:
Optionally, you may enable protection against accidental termination. This is a setting that does not cost anything, and is of great use when you are preparing an instance to launch to production.
(Optional) Enable "Termination protection":

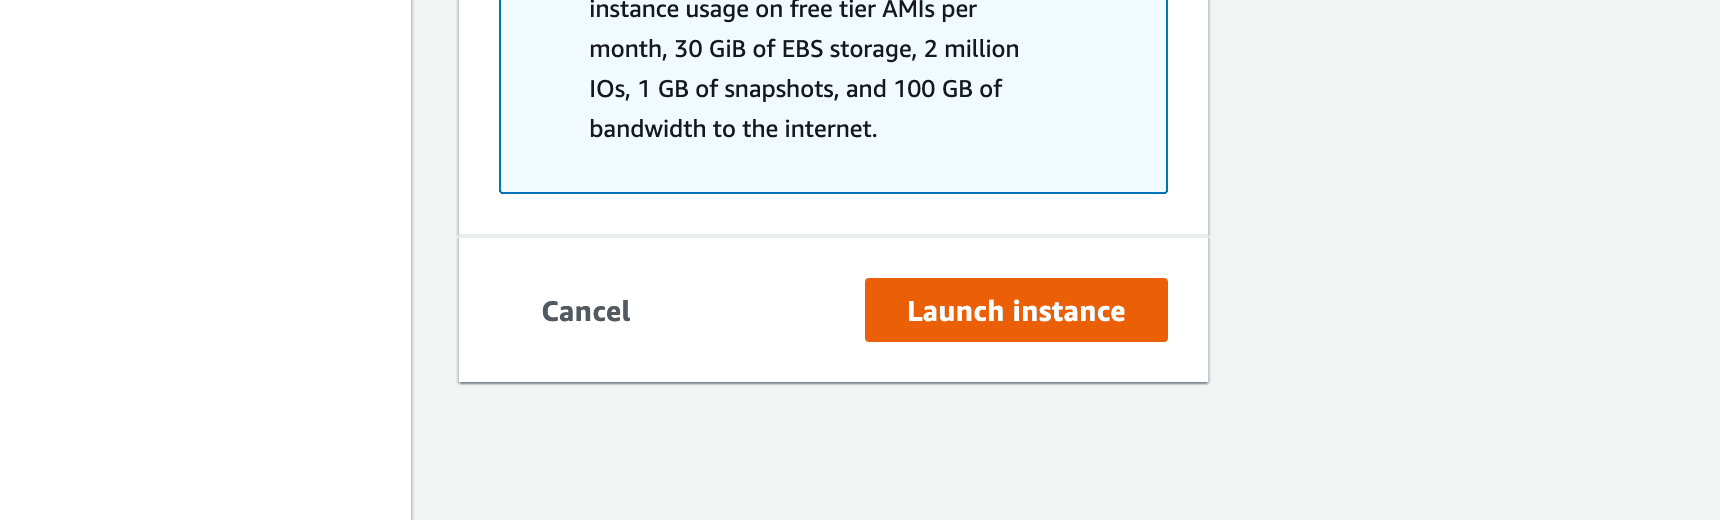
Now we are ready to launch our instance, and we will press the "Launch instance" button, on the right side of the page.
Press Launch instance:
Success, we have launched our instance:
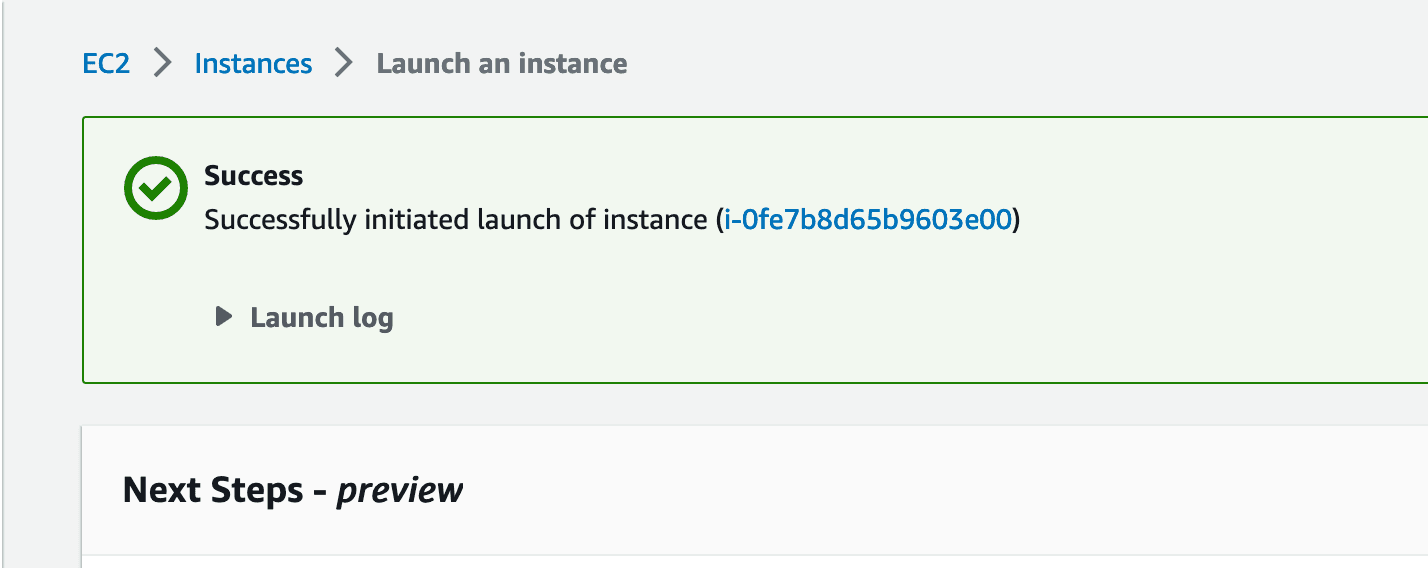
We may know click on the blue text that represents the Instance ID. By clicking it, we will be taken to the Instances page of the EC2 Dashboard.
Instances Page on the EC2 Dashboard:
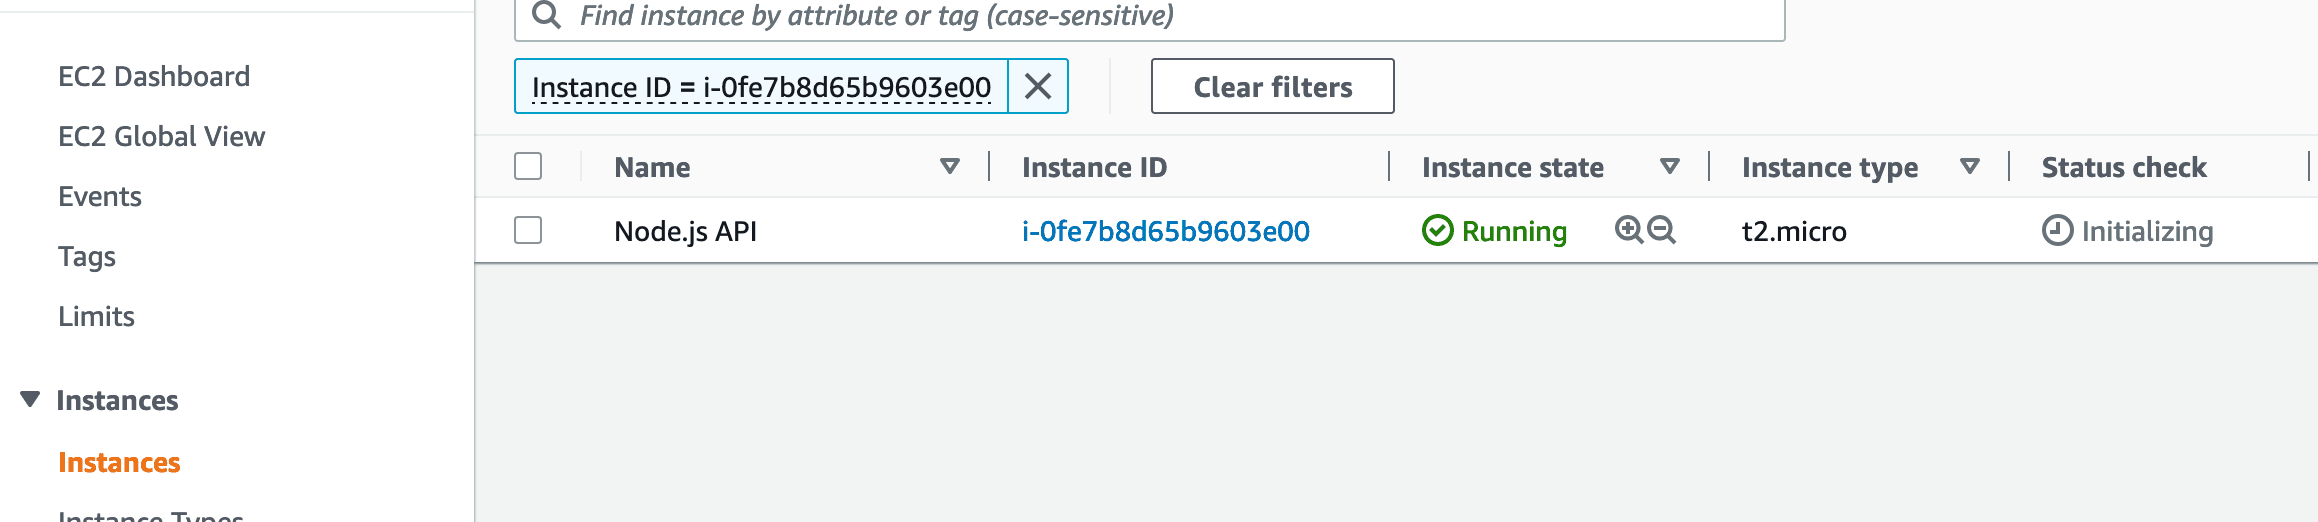
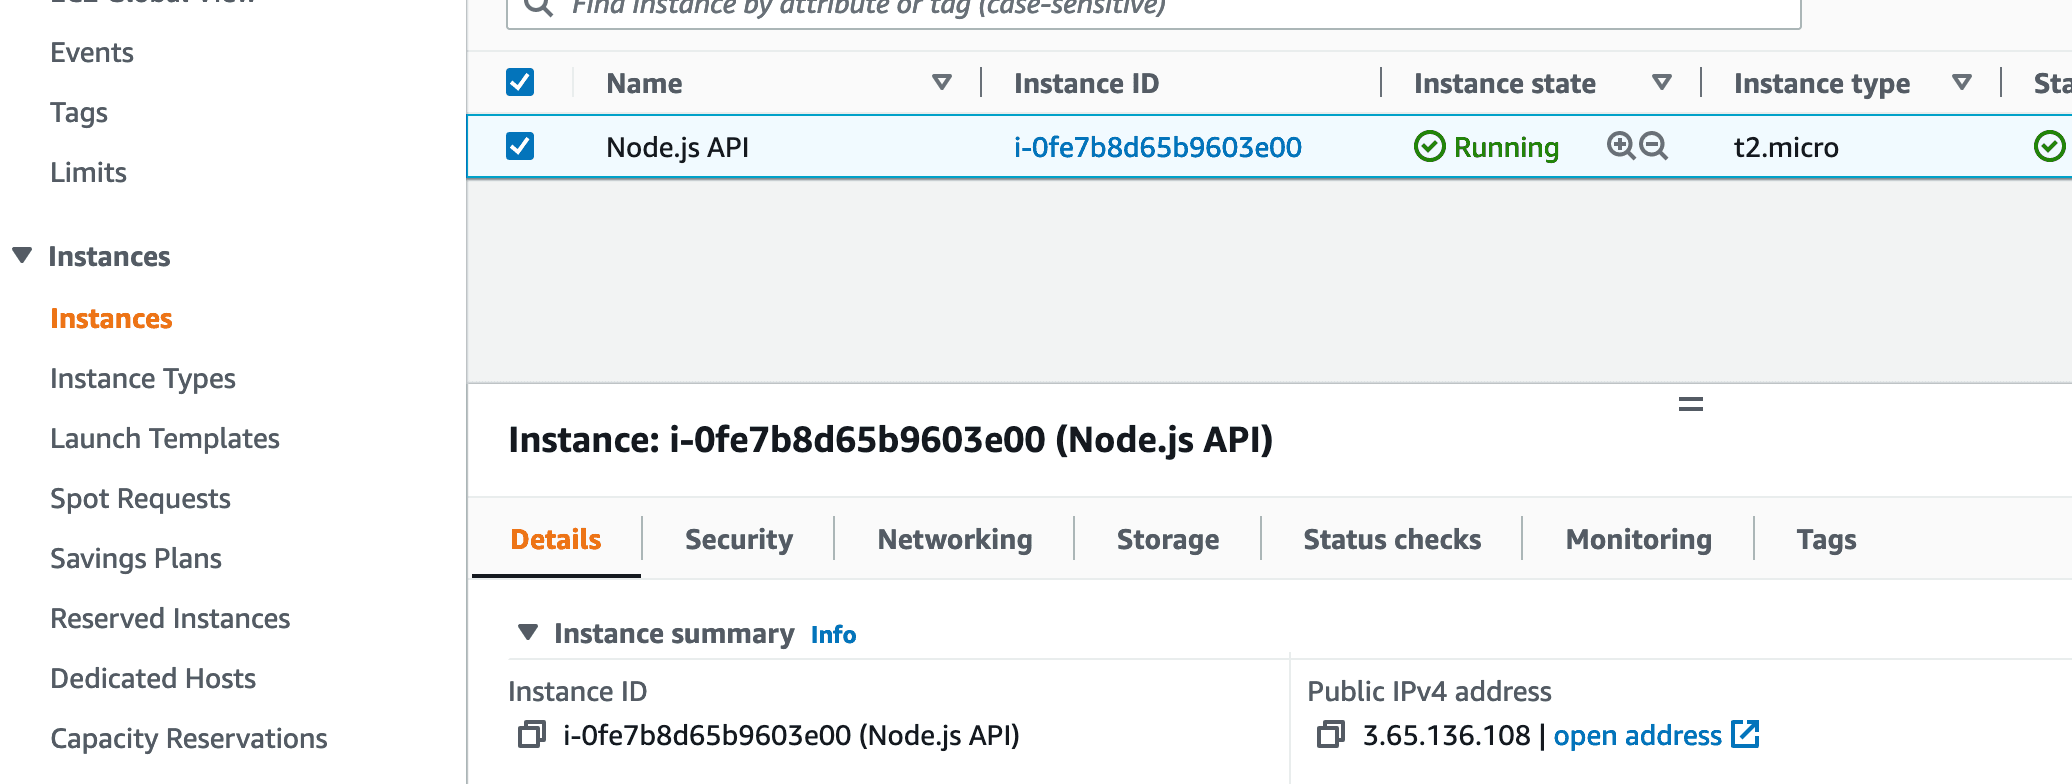
We will now select our instance by ticking the checkbox near its name, and then we will have to open the details, using the button with an arrow pointing up, that denotes expanding the content, which will be in the bottom right corner of the page.
Select Instance and Expand Instance Details:
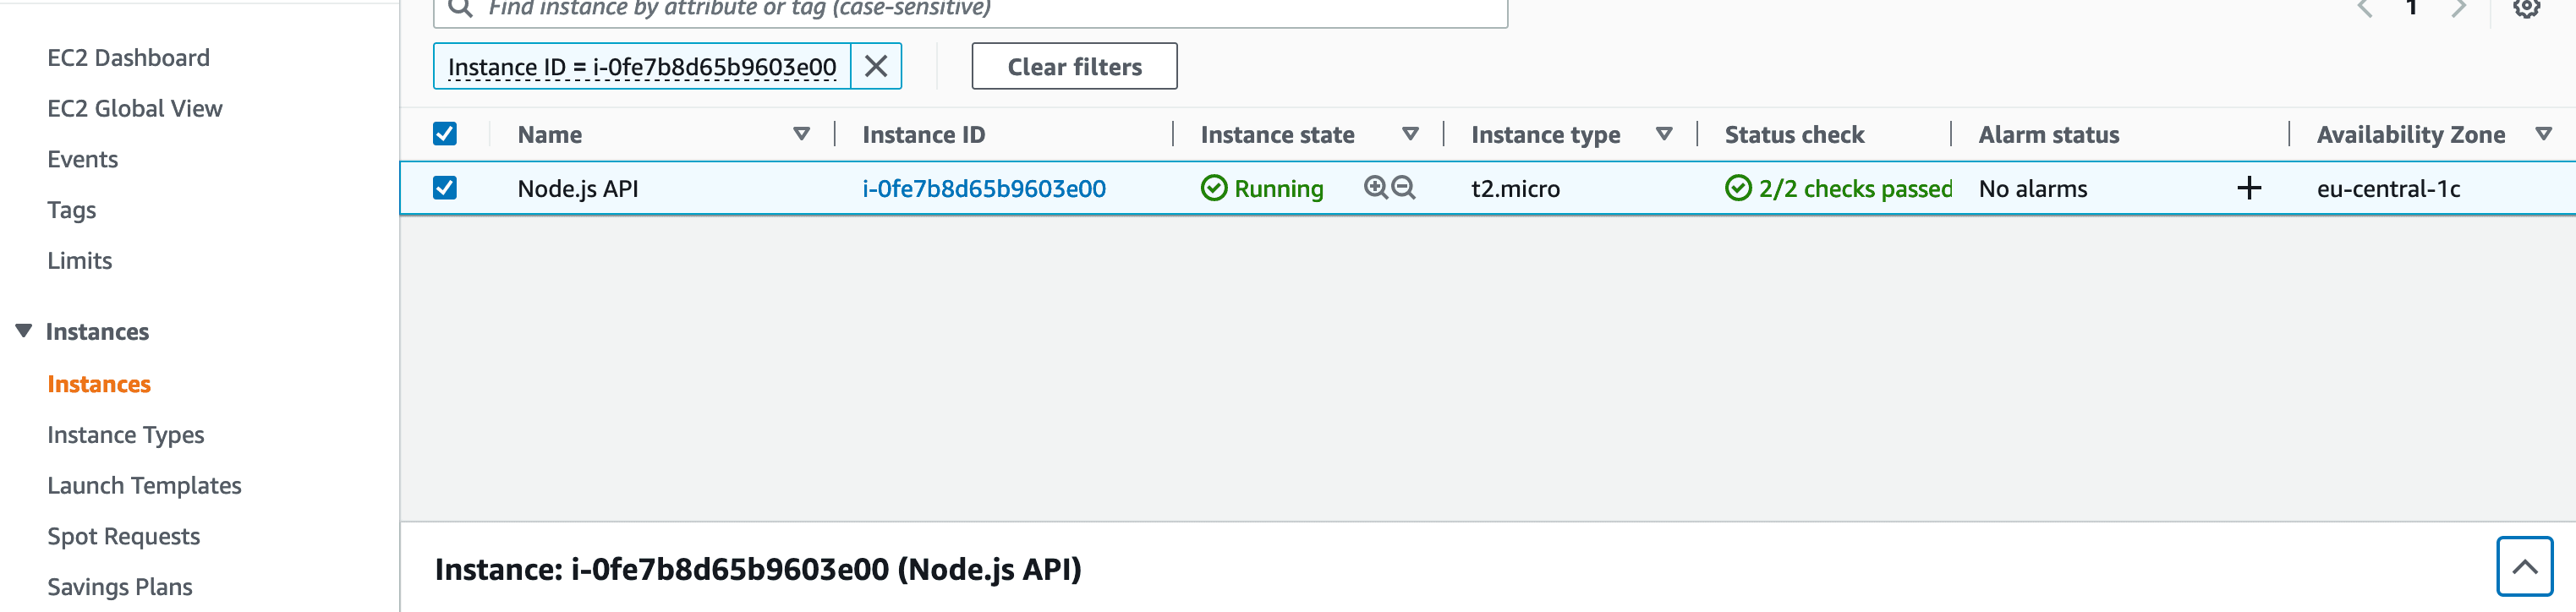
Next, the Instance details will be open. In this panel you will find details about your instance, the most important one you'll be interested in being the "Public IPv4 address".
Instance Details Opened:
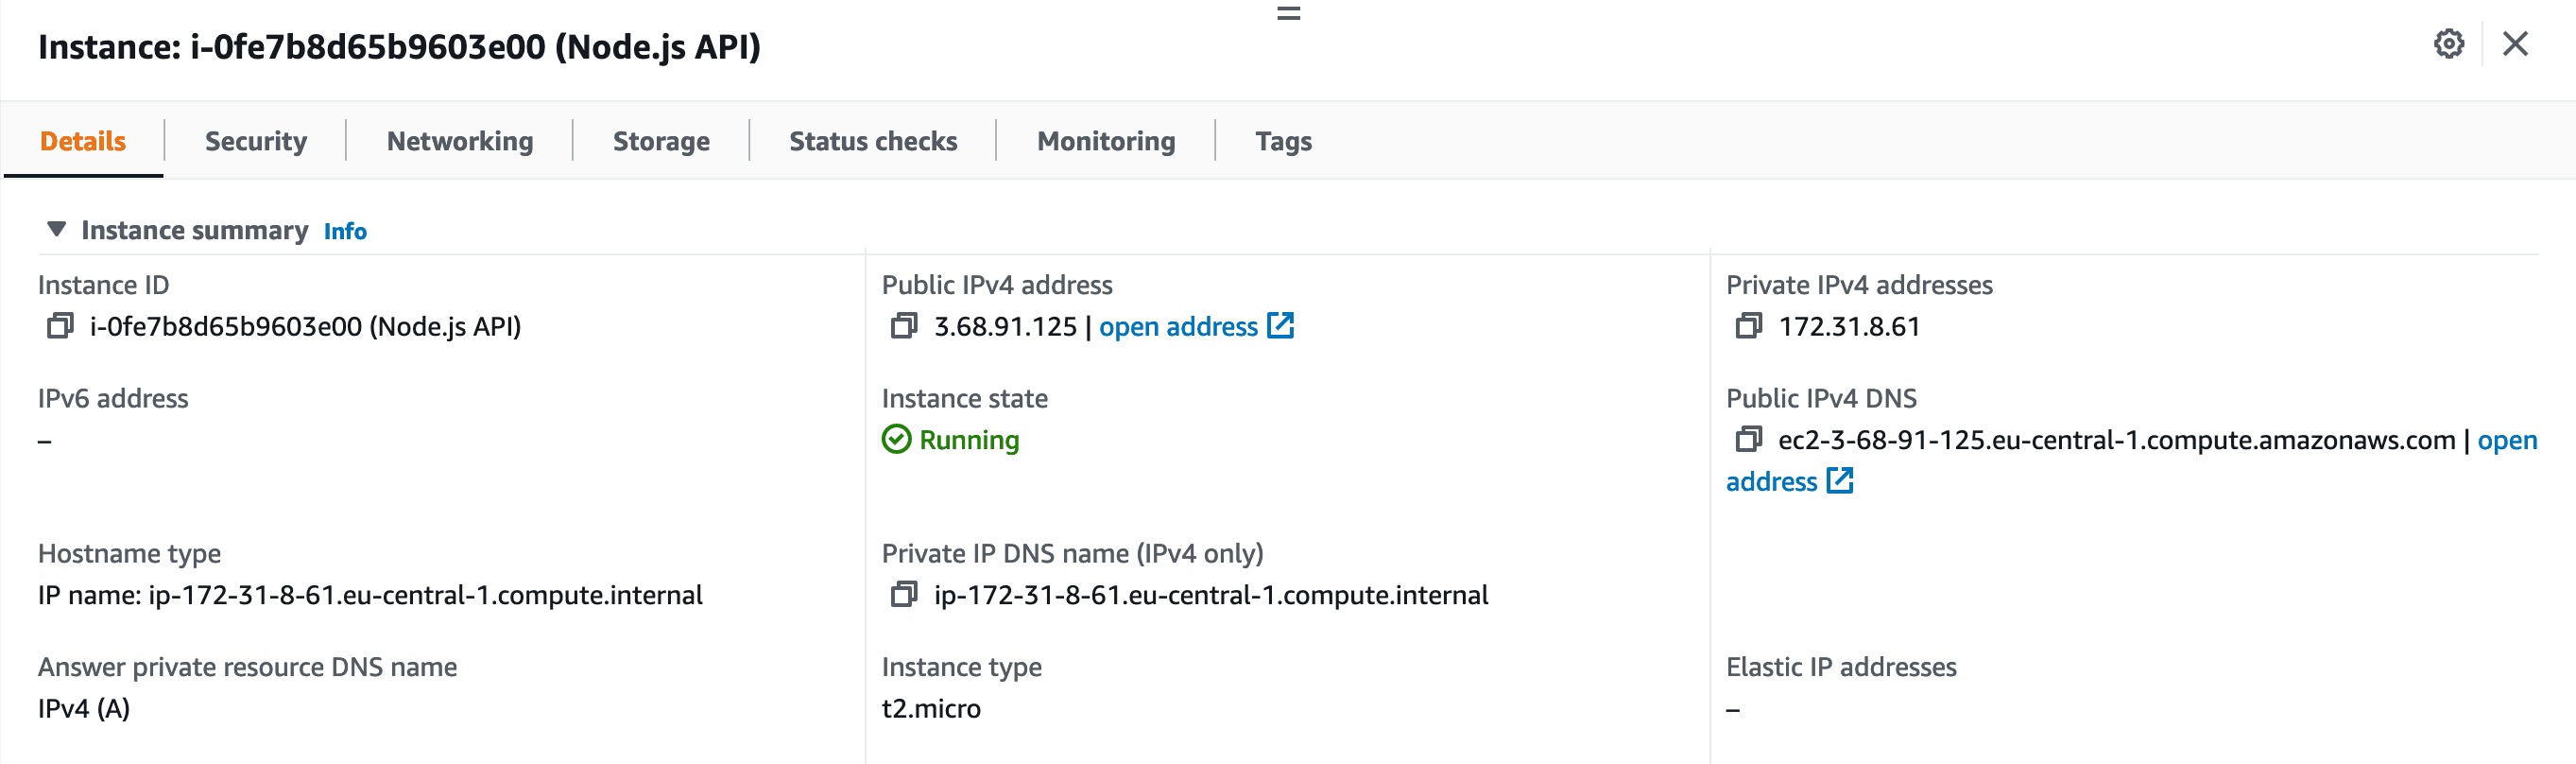
The IPv4 will be used to Assign a Domain to your Instance, therefore it is recommended that the IPv4 remains the same.
If at some point your Instance is restarted, then the IP will be changed automatically by AWS.
In order to prevent this from happening, we will need to assign an "Elastic IP" to the Instance.
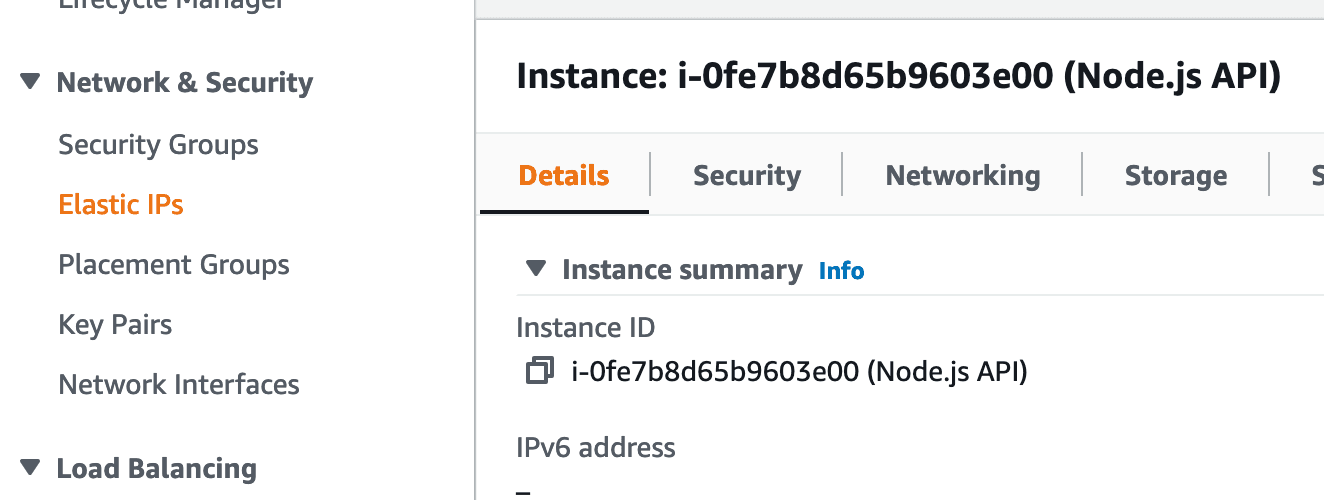
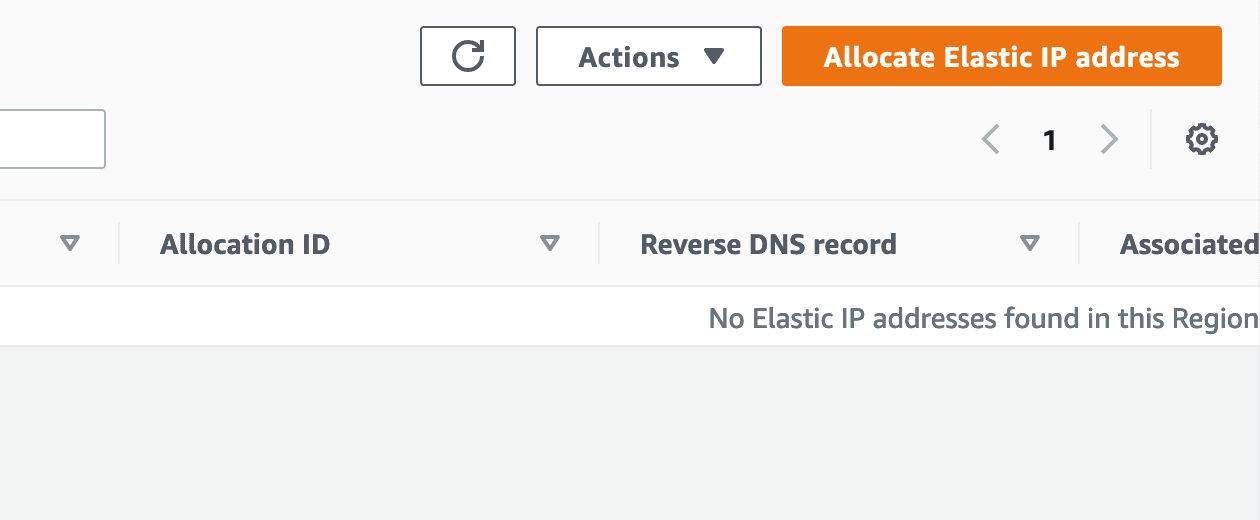
On the left-side menu, scroll down until you find the "Network & Security" section, then click on "Elastic IPs" to proceed.
Go to Elastic IPs:
In the top right corner, click on "Allocate Elastic IP address":
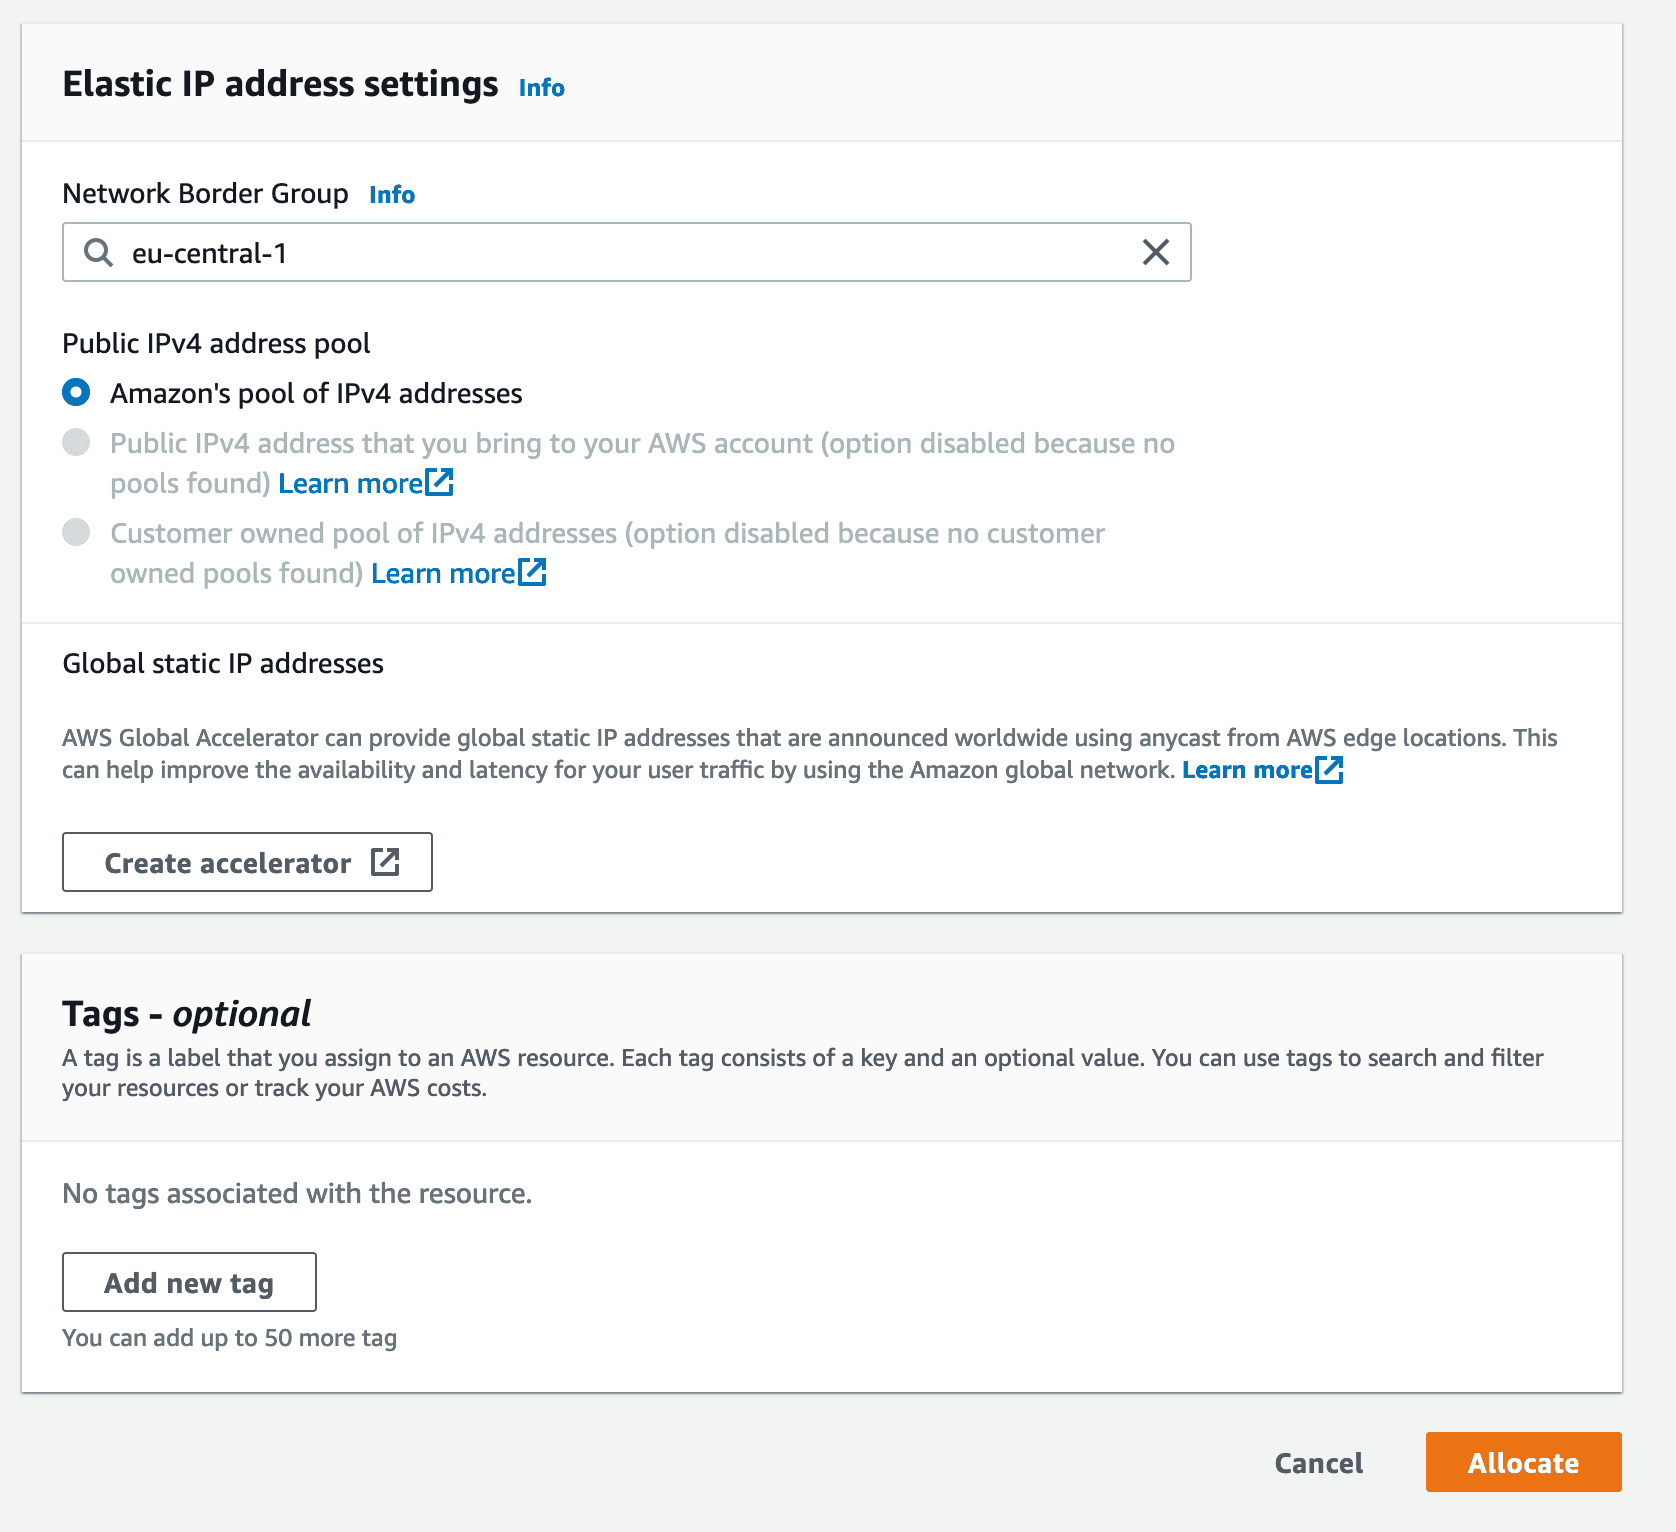
You do not need to change anything in the next form, you may just click on "Allocate" to reserve a static IP address.
Leave the form as it is and click "Allocate":
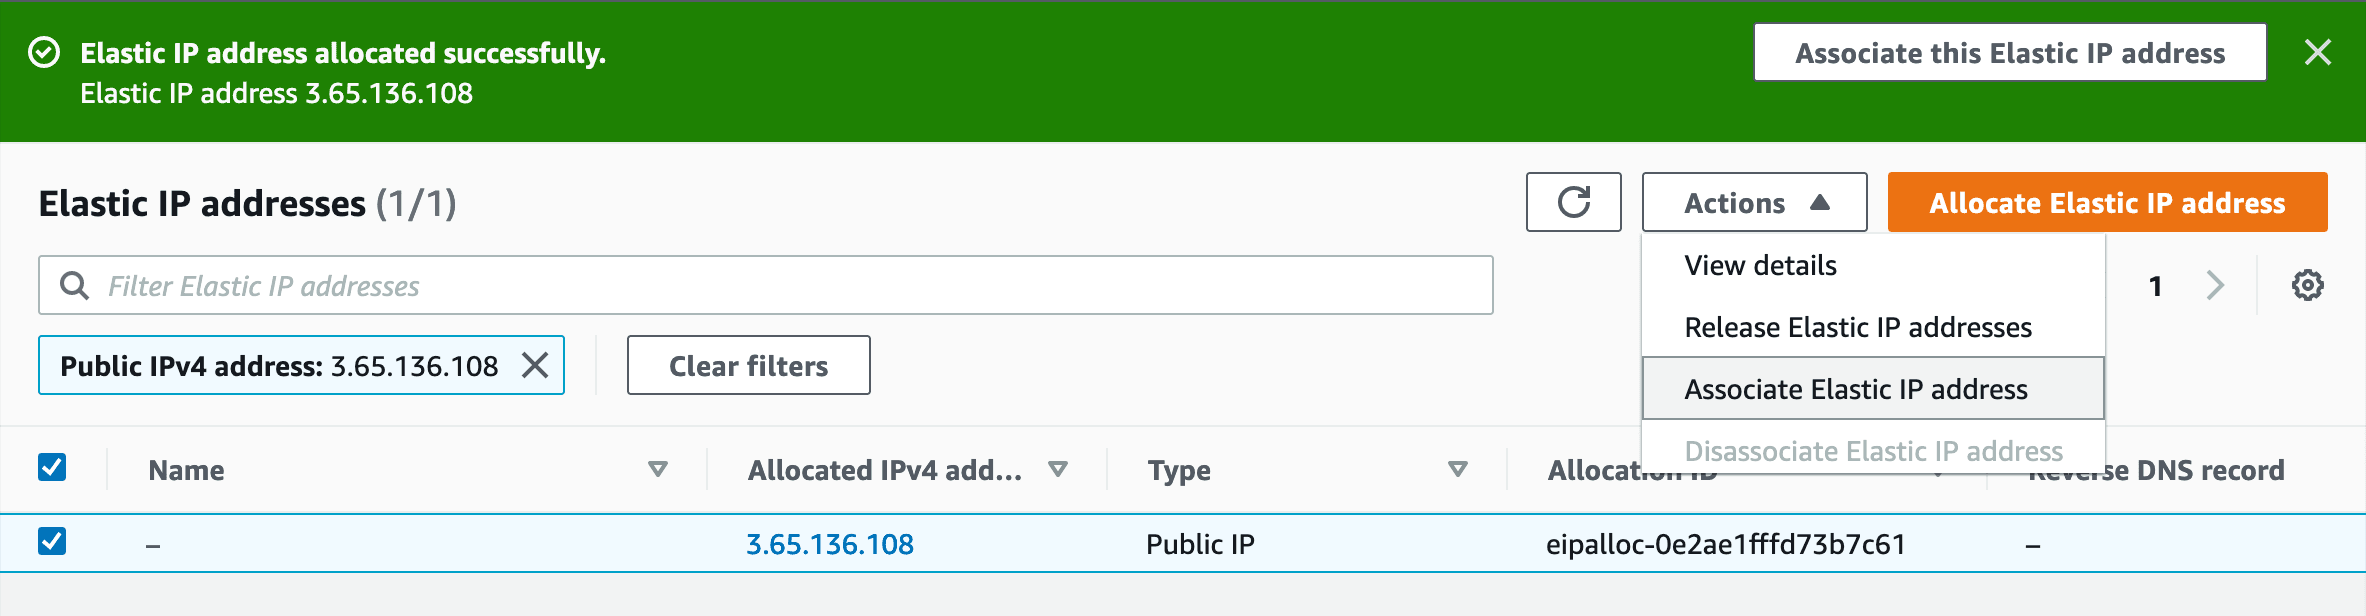
You will be taken to the next screen and the Allocated Elastic IP will be automatically selected. At this point, you may click on "Actions" and then on "Associate Elastic IP address".
Begin Associating Elastic IP address:
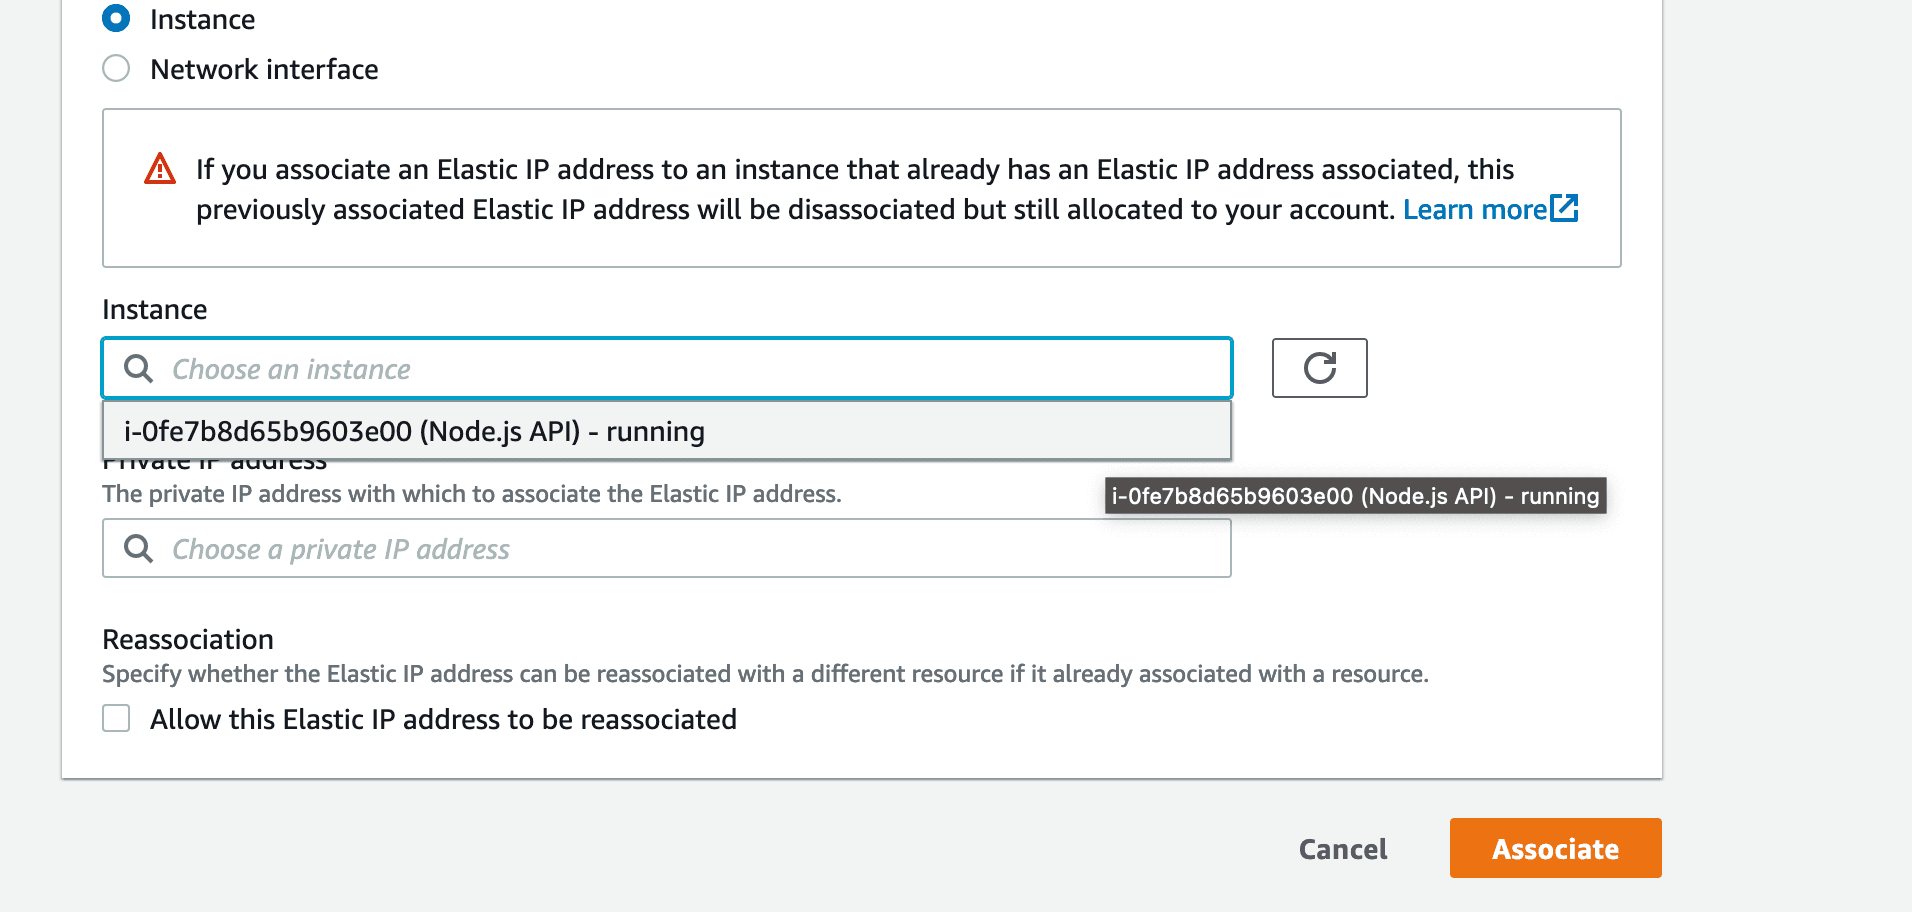
On the next form, select your Instance from the "Instance" select, then click "Associate"
Finish Associating Elastic IP address:
We may now return to the "Instances" page of the EC2 Dashboard (by using the left-side menu), and the newly associated Elastic IP will now be our IPv4 address.
Setup Complete for the AWS EC2 Instance:
We have now completed the setup steps that were required on the AWS Management Console.
Next, we will connect to our instance and start adding the required software.
Connecting to your Instance using Terminal / Git Bash:
In order to open a SSH connection to the instance, we will need:
the Key pair
the IPv4 address of the instance
the username of the user allowed to connect to the instance
First, open the Terminal in the same folder where you are currently storing the previously downloaded Key pair. (it is likely that it is in the Downloads folder of your computer)
Next, you will need to copy the value of the IPv4 address, from the AWS Management Console. (from the place displayed in the photo that is just above this section)
Next, you will need to enter the following command in the Terminal: (make sure to replace the IPv4 in the following command with the value you copied)
ssh -i nodejs-aws-instance-key.pem [email protected]You may have noticed that the username is "ubuntu" - this is the default for Ubuntu on AWS EC2.
Note: if you named your Key pair differently than what we displayed in this tutorial, make sure to use its name in the command above instead of our key's name.
Once you press Enter you will be presented with:
The authenticity of host '3.65.136.108 (3.65.136.108)' can't be established.
ED25519 key fingerprint is SHA256:cwa8vHADtrwDqHWA2tcnGZPePYwgjKa/q4tj5W3eKhI.
This key is not known by any other names
Are you sure you want to continue connecting (yes/no/[fingerprint])?
You may type "yes" and then tap Enter again.
The following error may occur:
Are you sure you want to continue connecting (yes/no/[fingerprint])? yes
Warning: Permanently added '3.65.136.108' (ED25519) to the list of known hosts.
@@@@@@@@@@@@@@@@@@@@@@@@@@@@@@@@@@@@@@@@@@@@@@@@@@@@@@@@@@@
@         WARNING: UNPROTECTED PRIVATE KEY FILE!          @
@@@@@@@@@@@@@@@@@@@@@@@@@@@@@@@@@@@@@@@@@@@@@@@@@@@@@@@@@@@
Permissions 0644 for 'nodejs-aws-instance-key.pem' are too open.
It is required that your private key files are NOT accessible by others.
This private key will be ignored.
Load key "nodejs-aws-instance-key.pem": bad permissions
[email protected]: Permission denied (publickey).
This is happening because the key may need different permissions to be used by the SSH Client. To fix this, run the following command:
chmod 400 nodejs-aws-instance-key.pemAnd then re-run:
ssh -i nodejs-aws-instance-key.pem [email protected]You should now be presented with the following message:
Welcome to Ubuntu 22.04.1 LTS (GNU/Linux 5.15.0-1026-aws x86_64)

 * Documentation:  https://help.ubuntu.com
 * Management:     https://landscape.canonical.com
 * Support:        https://ubuntu.com/advantage

  System information as of Fri Dec 30 15:00:25 UTC 2022

  System load:  0.0               Processes:             97
  Usage of /:   20.0% of 7.57GB   Users logged in:       0
  Memory usage: 21%               IPv4 address for eth0: 172.31.8.61
  Swap usage:   0%

0 updates can be applied immediately.


The list of available updates is more than a week old.
To check for new updates run: sudo apt update


The programs included with the Ubuntu system are free software;
the exact distribution terms for each program are described in the
individual files in /usr/share/doc/*/copyright.

Ubuntu comes with ABSOLUTELY NO WARRANTY, to the extent permitted by
applicable law.

To run a command as administrator (user "root"), use "sudo <command>".
See "man sudo_root" for details.

ubuntu@ip-172-31-8-61:~$
Which means that you have successfully connected to your instance.
Installing required software:
We will install Node.js using nvm. Run the following commands to do it - if you wish to understand more about what these commands do, please refer to the documentation for nvm: https://github.com/nvm-sh/nvm
curl -o- https://raw.githubusercontent.com/nvm-sh/nvm/v0.39.3/install.sh | bashThen:
export NVM_DIR="$([ -z "${XDG_CONFIG_HOME-}" ] && printf %s "${HOME}/.nvm" || printf %s "${XDG_CONFIG_HOME}/nvm")"
[ -s "$NVM_DIR/nvm.sh" ] && \. "$NVM_DIR/nvm.sh" # This loads nvm
Then:
nvm install v18.12.1You may install any other version of Node.js, but for this article we will be using the latest LTS available: v18.12.1.
Depending on when you are reading this article, the LTS version may have changed, and you may want to install the latest one.
In order to get the full list of available Node.js versions, run "nvm ls-remote"
The output of the install command should look like this:
Downloading and installing node v18.12.1...
Downloading https://nodejs.org/dist/v18.12.1/node-v18.12.1-linux-x64.tar.xz...
################################################################################################################################ 100.0%
Computing checksum with sha256sum
Checksums matched!
Now using node v18.12.1 (npm v8.19.2)
Creating default alias: default -> v18.12.1
If you now run
node -vYou will see that Node.js v18.12.1 has been successfully installed.
We will proceed to install MongoDB, and we will be following the following page from the official documentation: https://www.mongodb.com/docs/manual/tutorial/install-mongodb-on-ubuntu/
Please make sure to refer to the official documentation if the steps we provide below become outdated. We will try out best to keep everything up to date, therefore you can keep reading this section safely.
wget -qO - https://www.mongodb.org/static/pgp/server-6.0.asc | sudo apt-key add -Then:
echo "deb [ arch=amd64,arm64 ] https://repo.mongodb.org/apt/ubuntu focal/mongodb-org/6.0 multiverse" | sudo tee /etc/apt/sources.list.d/mongodb-org-6.0.listThen:
sudo apt-get updateAnd finally:
sudo apt-get install -y mongodb-orgAnd you will receive this error:
ubuntu@ip-172-31-8-61:~$ sudo apt-get install -y mongodb-org
Reading package lists... Done
Building dependency tree... Done
Reading state information... Done
Some packages could not be installed. This may mean that you have
requested an impossible situation or if you are using the unstable
distribution that some required packages have not yet been created
or been moved out of Incoming.
The following information may help to resolve the situation:

The following packages have unmet dependencies:
 mongodb-org-mongos : Depends: libssl1.1 (>= 1.1.1) but it is not installable
 mongodb-org-server : Depends: libssl1.1 (>= 1.1.1) but it is not installable
E: Unable to correct problems, you have held broken packages.
This is happening because, at the time of writing this article, there is no official support of MongoDB for Ubuntu 22.04, which is the OS we have chosen at the beginning.
The following commands are a workaround for the issue:
wget http://archive.ubuntu.com/ubuntu/pool/main/o/openssl/libssl1.1_1.1.1f-1ubuntu2_amd64.deb Then:
sudo dpkg -i libssl1.1_1.1.1f-1ubuntu2_amd64.debAnd finally:
sudo apt-get install -y mongodb-orgAfter the installation process finished, you may now start MongoDB:
sudo systemctl start mongodShort Q&A
Do I need to create a user in MongoDB to access it from my application?
Ideally, yes - you should never use the root user, of any database, to connect to it, unless you are intentionally doing it.
Will we be creating a user for the database to use in this tutorial?
No, and the reasons why are:
We want to keep this article rather simple
With the methodology we're taking, you are never exposing MongoDB to the internet - you may only access MongoDB if you have access to the AWS EC2 instance
Since we are never exposing port 27017 (which is the default MongoDB port) to the Internet, access to MongoDB requires that you use Key pair that we have created previously.
If you are using this guide without our AWS Setup Steps, please make sure that you either add a Database administrator user with a strong password OR that you are closing all access to the Internet on port 27017.
How do I backup my database?
Based on the backup strategy, choose one of the following:
Manual: using mongodump and mongorestore, as described in https://www.mongodb.com/docs/manual/tutorial/backup-and-restore-tools/
Automated: you will have to backup the AWS EC2 Instance, therefore you will need to refer to the "Lifecycle Manager" service, which you will find on the EC2 Dashboard, in the left-side navigation menu
Back to installing the required software
We will now install Nginx:
sudo apt updateAnd:
sudo apt install nginxTo which when prompted for an answer, type "Y", then press Enter:
ubuntu@ip-172-31-8-61:~$ sudo apt install nginx
Reading package lists... Done
Building dependency tree... Done
Reading state information... Done
The following additional packages will be installed:
  fontconfig-config fonts-dejavu-core libdeflate0 libfontconfig1 libgd3 libjbig0 libjpeg-turbo8 libjpeg8 libnginx-mod-http-geoip2
  libnginx-mod-http-image-filter libnginx-mod-http-xslt-filter libnginx-mod-mail libnginx-mod-stream libnginx-mod-stream-geoip2
  libtiff5 libwebp7 libxpm4 nginx-common nginx-core
Suggested packages:
  libgd-tools fcgiwrap nginx-doc ssl-cert
The following NEW packages will be installed:
  fontconfig-config fonts-dejavu-core libdeflate0 libfontconfig1 libgd3 libjbig0 libjpeg-turbo8 libjpeg8 libnginx-mod-http-geoip2
  libnginx-mod-http-image-filter libnginx-mod-http-xslt-filter libnginx-mod-mail libnginx-mod-stream libnginx-mod-stream-geoip2
  libtiff5 libwebp7 libxpm4 nginx nginx-common nginx-core
0 upgraded, 20 newly installed, 0 to remove and 26 not upgraded.
Need to get 2688 kB of archives.
After this operation, 8334 kB of additional disk space will be used.
Do you want to continue? [Y/n] Y
And we are done installing packages.
Important security settings
AWS does a great job at making sure that our server is secured and that no one can access it, using any port.
At the same time, we can take an additional step to make our server bulletproof, and that is enabling Ubuntu Firewall.
We will enable Ubuntu Firewall and add a few rules that will allow SSH access and HTTP & HTTPS requests (on ports 80 and, respectively, 443):
sudo ufw allow 'OpenSSH' && sudo ufw allow 'Nginx HTTP' && sudo ufw allow 'Nginx HTTPS'Then we will enable the Firewall:
sudo ufw enableWhen prompted to confirm, type "y" then press Enter:
Command may disrupt existing ssh connections. Proceed with operation (y|n)? yAnd then Ubuntu Firewall will be enabled, making our server bulletproof.
If you are performing the setup on another CSP, such as Google Cloud or DigitalOcean, you can run all commands in this section as they are not AWS specific, and they will help enchance your Instance's security.
Connecting to MongoDB with MongoDB Compass:
We have successfully installed MongoDB on our AWS EC2 Instance, and we now want to be able to view it in MongoDB Compass, so that we may easily manage it.
There are multiple ways to do it, but the one we prefer is using an SSH Reverse Tunnel, which sounds horribly complicated.
In reality, it will allow to to access MongoDB from the EC2 Instance using your localhost, which means you can also use this method to debug the production database locally. (but we advise against using the production database for the development process :) )
Open a new Terminal, then run:
ssh -i nodejs-aws-instance-key.pem -L 28017:localhost:27017 [email protected]As with previous commands, make sure to replace the IPv4 value, and the Key pair, if yours has a different name.
MongoDB will now be accessible on your localhost, on port 28017. In order to connect to it, open MongoDB Compass, and type in:
mongodb://localhost:28017Ta-da, you're now connected to the MongoDB database that is running on the Instance hosted on AWS EC2.
Additionally, by being able to connect to it, we have validated that we have successfully installed and configured MongoDB.
Connecting Cyberduck / FileZilla to the EC2 Instance:
We are doing this to allow you to upload the Node.js Application's code on the EC2 Instance.
Open Cyberduck, then look for the "+" button to add a Bookmark:
Fill in Instance's details, pick your Key pair in the "SSH Private Key" field (click on "Choose...", then browse your computer for it)
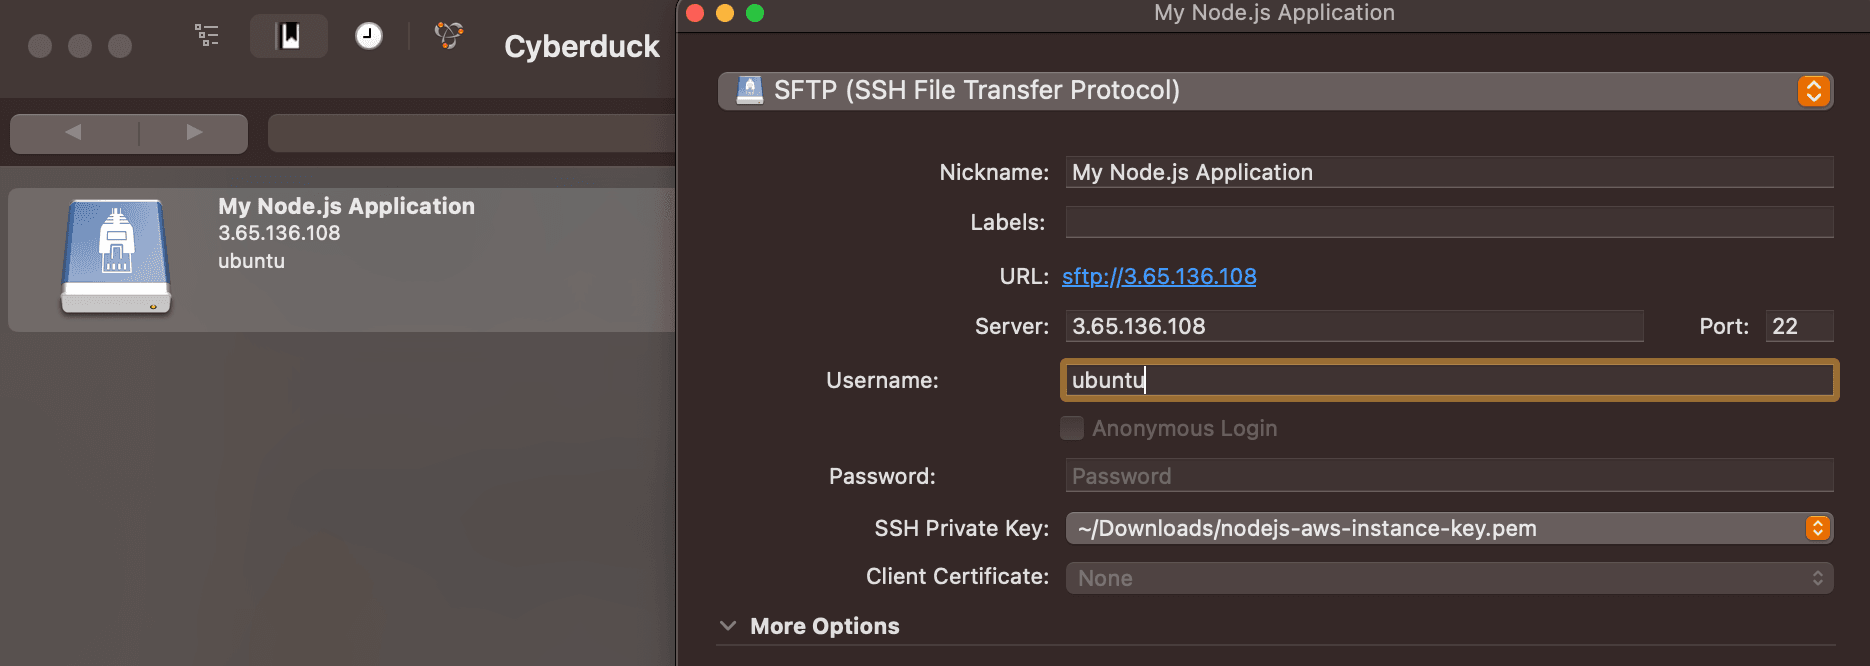
Now you may double tap on "My Node.js Application" and you will be connected to the EC2 Instance
Successfully connected to the EC2 Instance using Cyberduck

Now that we have successfully connected to the Instance, we may upload the folder of the Node.js Application that we are deploying.
If you have not cloned the example repository yet, you can find it here: https://github.com/Pro-Application-Tech/node-js-on-aws
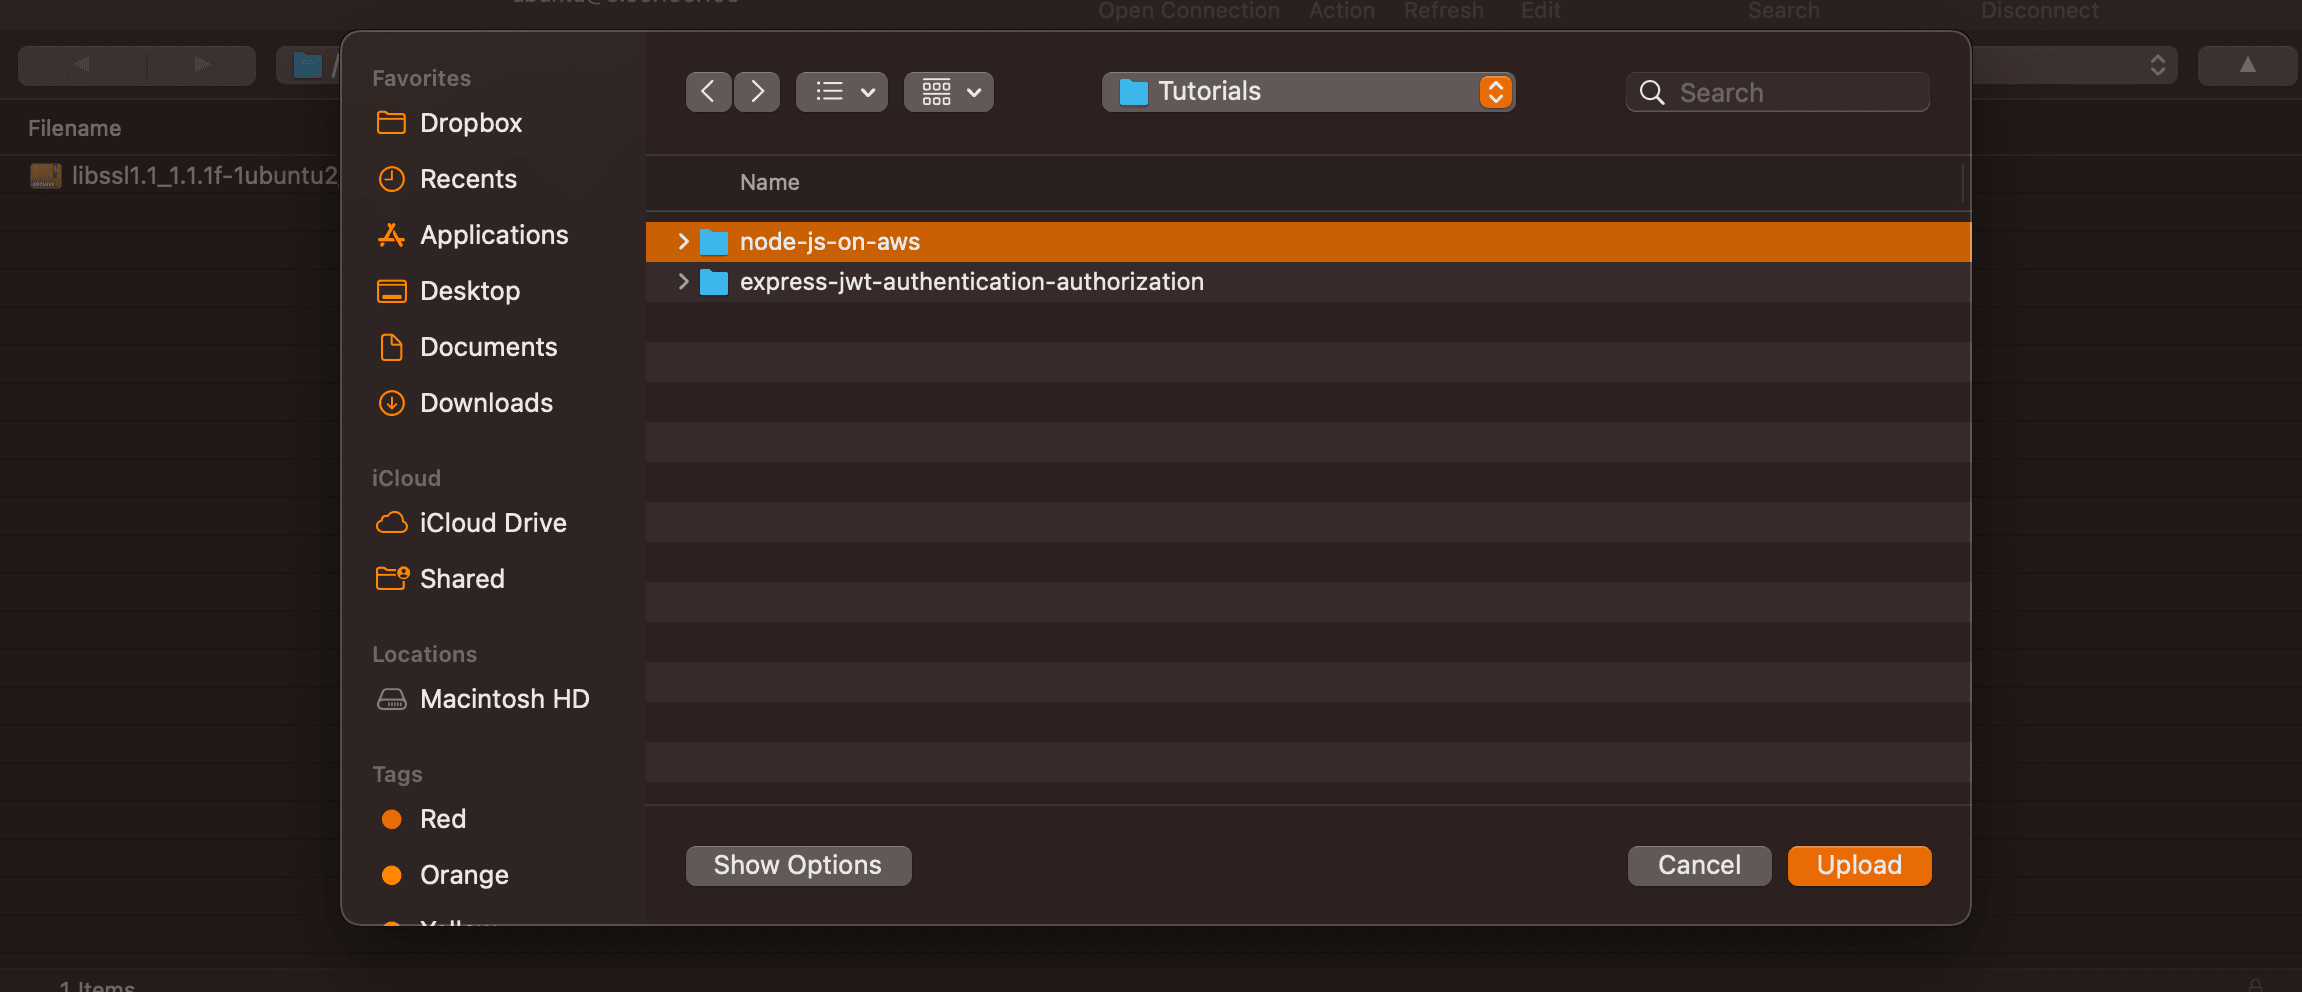
Right click anywhere in the file browser in Cyberduck and click "Upload":
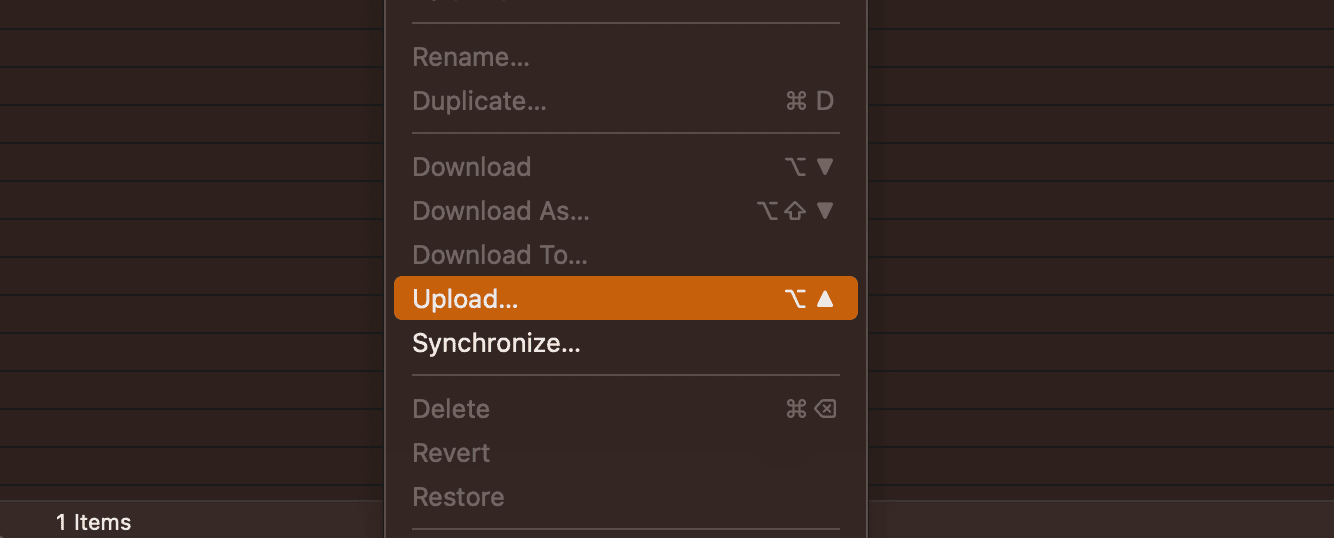
Pick the folder of the Node.js Application and confirm choice by pressing the "Upload" button:
Wait until transfer is finished, and you are done:
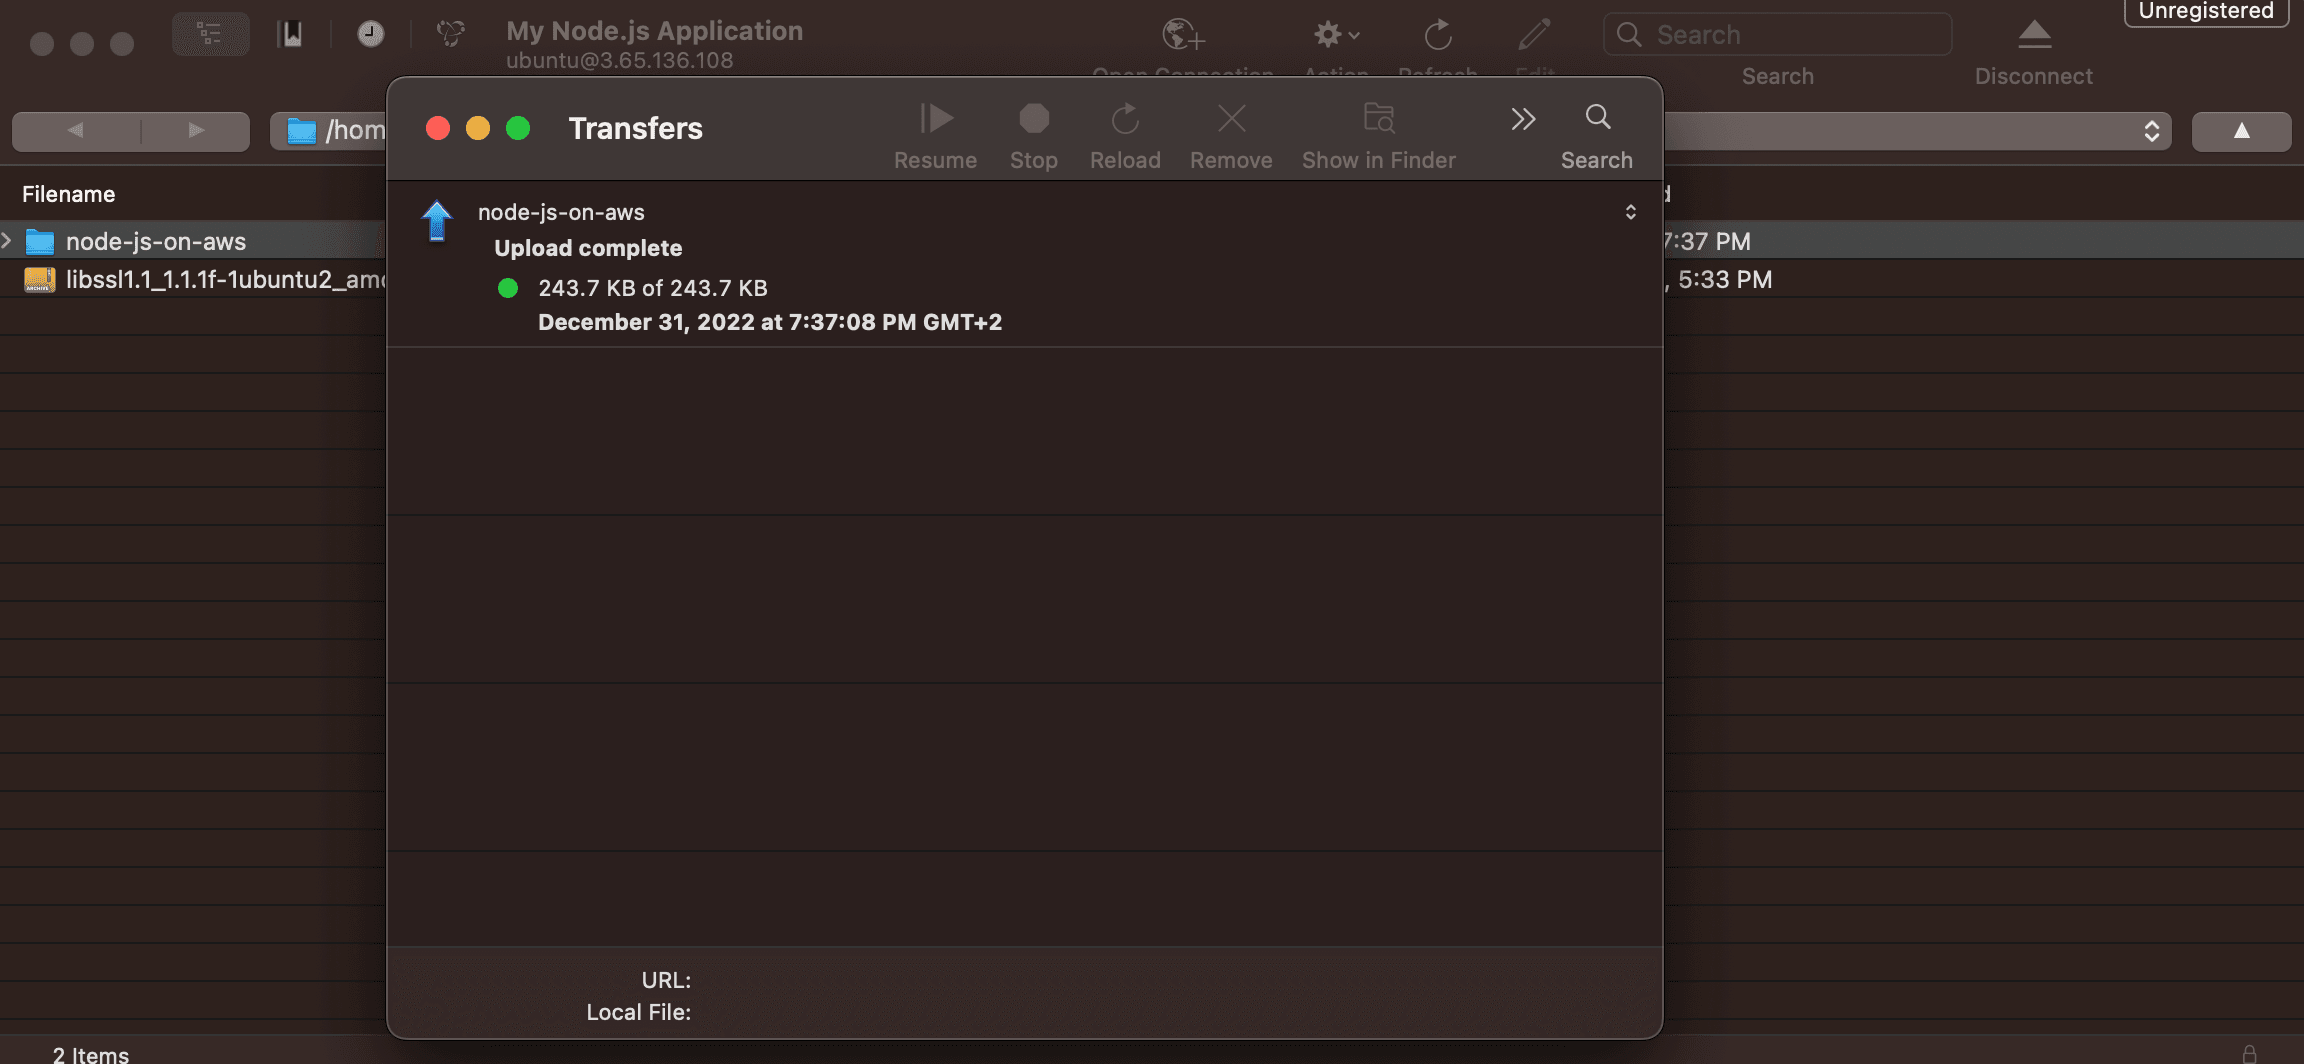
We are done with Cyberduck, and we have successfully uploaded the Node.js Application's code to the EC2 Instance.
In the next section we will explain, amongst other things, what changes we have made to the code base that we developed in the Simple Authentication Using JWT (Node.js/Express) article.
Node.js Application Setup for Production
Changes to the Simple Authentication Using JWT (Node.js/Express) Repository
In order to launch the Node.js Application to Production, we have chosen to use PM2 which is a tool that allows you to manage multiple Node.js Applications running on the same server, and more, such as Application Monitoring, Performance Monitoring etc.
In order to use PM2, we have had to create a file called ecosystem.config.js, and add it to the code repository.
Therefore, the additions that we have made to the original Simple Authentication Using JWT (Node.js/Express) Repository are:
// ./ecosystem.config.js

module.exports = {
  apps: [
    {
      name: 'node-js-api',
      script: 'npm start',
    },
  ],
};
In order to use PM2, we will also need to install it globally on the EC2 Instance, therefore once you open a Terminal and have connected to it, run:
npm i -g pm2Environment file management
Given our environment variables are sensitive, and should not be added to a GitHub repository, environment management will have to be done manually.
The approach we will take is to upload a copy of the .env file that we consider to be suitable for Production on the EC2 Instance, and copy it to the project's folder whenever we deploy.
In order to deploy, we may choose either one of:
a slightly long deploy command
a sh file
We will choose the slightly long deploy command, which is straight forward, even though the sh file isn't much different, but we'd like for you to experiment with the slightly longer command in the future.
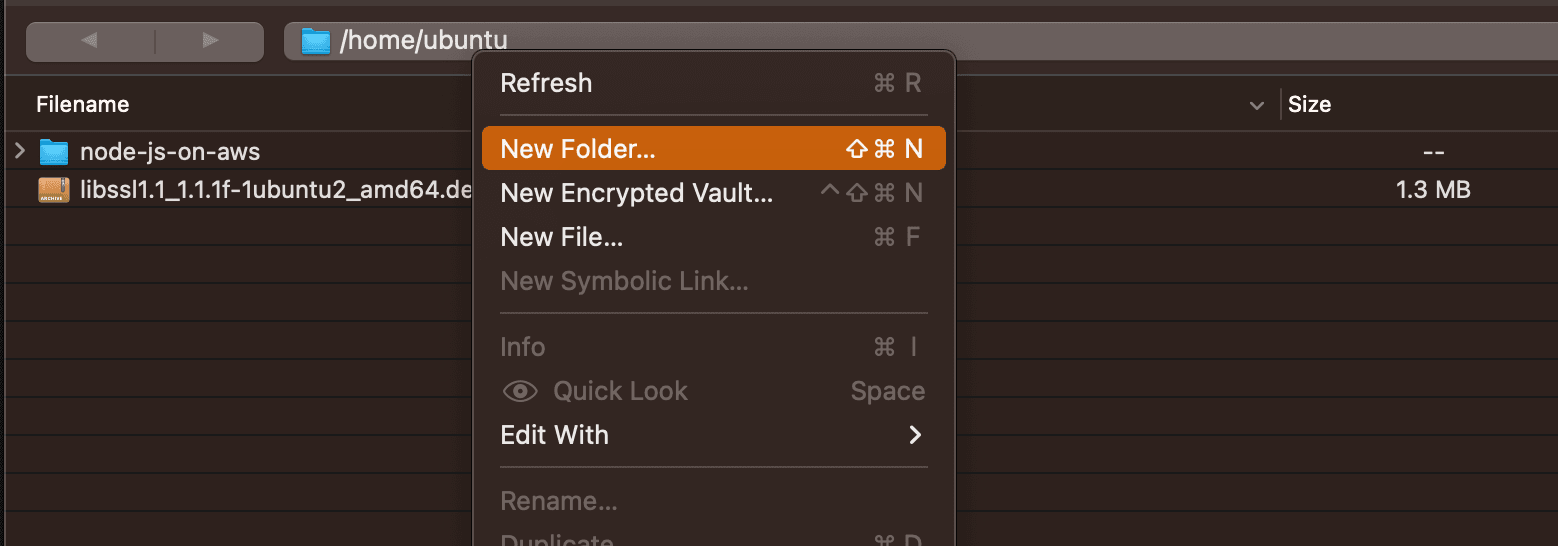
Using Cyberduck, we will create a new folder, on the EC2 Instance, and then add a file called .env inside it, with the contents we will show you below.
Right click inside Cyberduck and press "New Folder...":
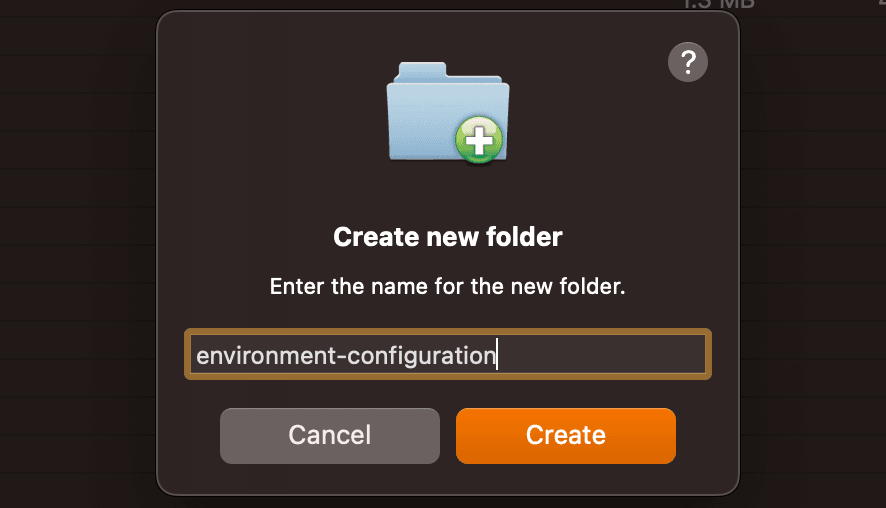
Type in the new folder's name and click "Create":
Double-click on the newly created folder to make it the currently open folder, and then right click and tap on "New File...":
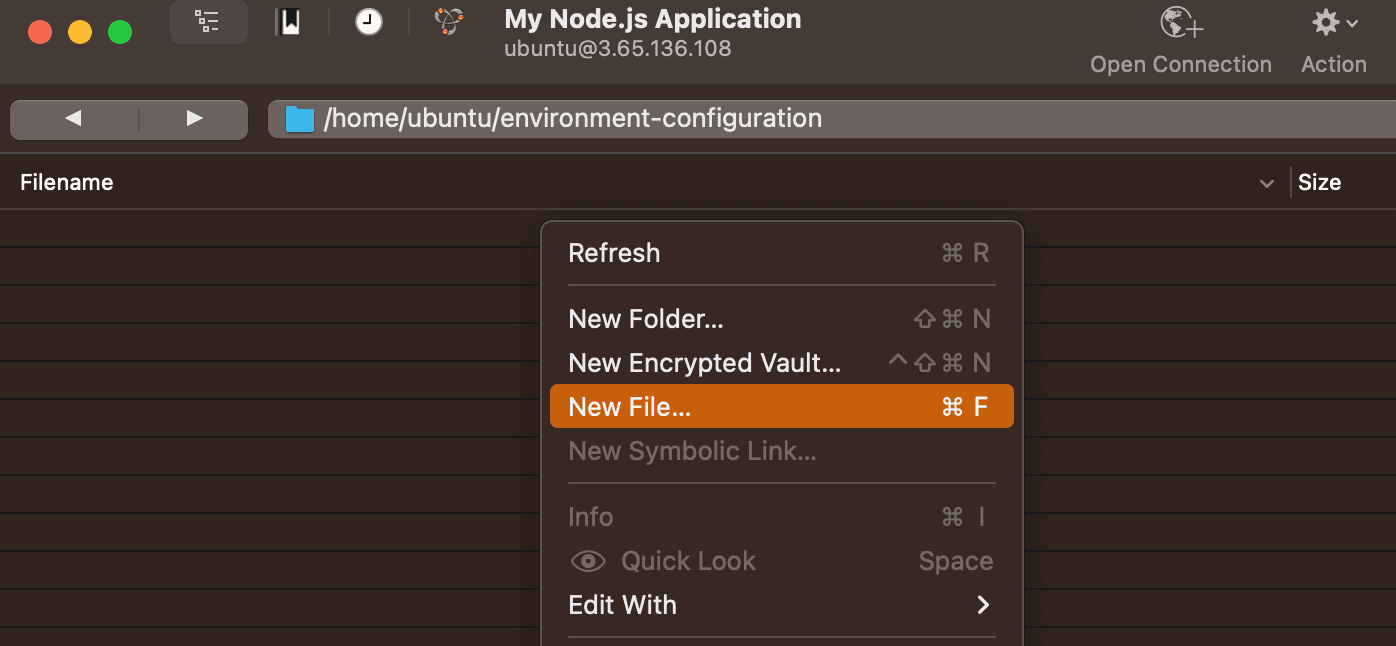
Type in the file's name, then click on "Edit":
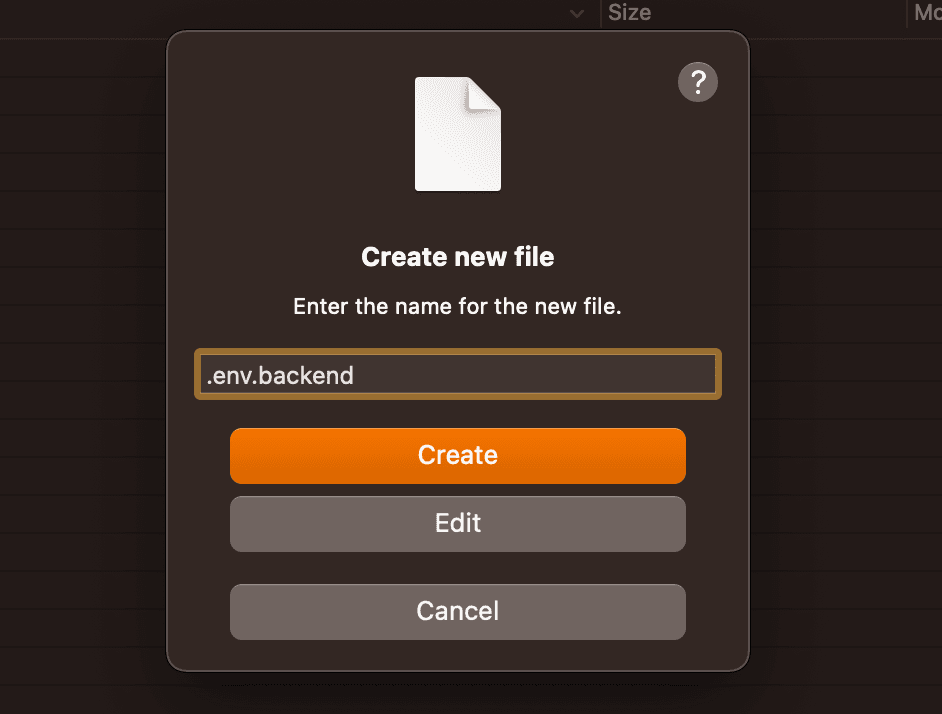
Your default text editor will now be opened. Inside it, paste the contents of your .env file. In our case, it is as follows:
# .env

# Express config
PORT=3000

# JWT config
JWT_SECRET="r@nd0m-str1ng"
JWT_EXPIRATION="7d"

# MongoDB config
MONGO_URI="mongodb://127.0.0.1:27017/node-js-on-aws"

# Frontend config
FRONTEND_URL=""
You may now save the file by pressing Cmd+S (or CTRL+S), then the text editor.
In case you clicked on "Create" instead of "Edit", proceed to the next step where we will show you how to display hidden files, and you may right click .env.backend and then edit it.
Let's check that our file has been created
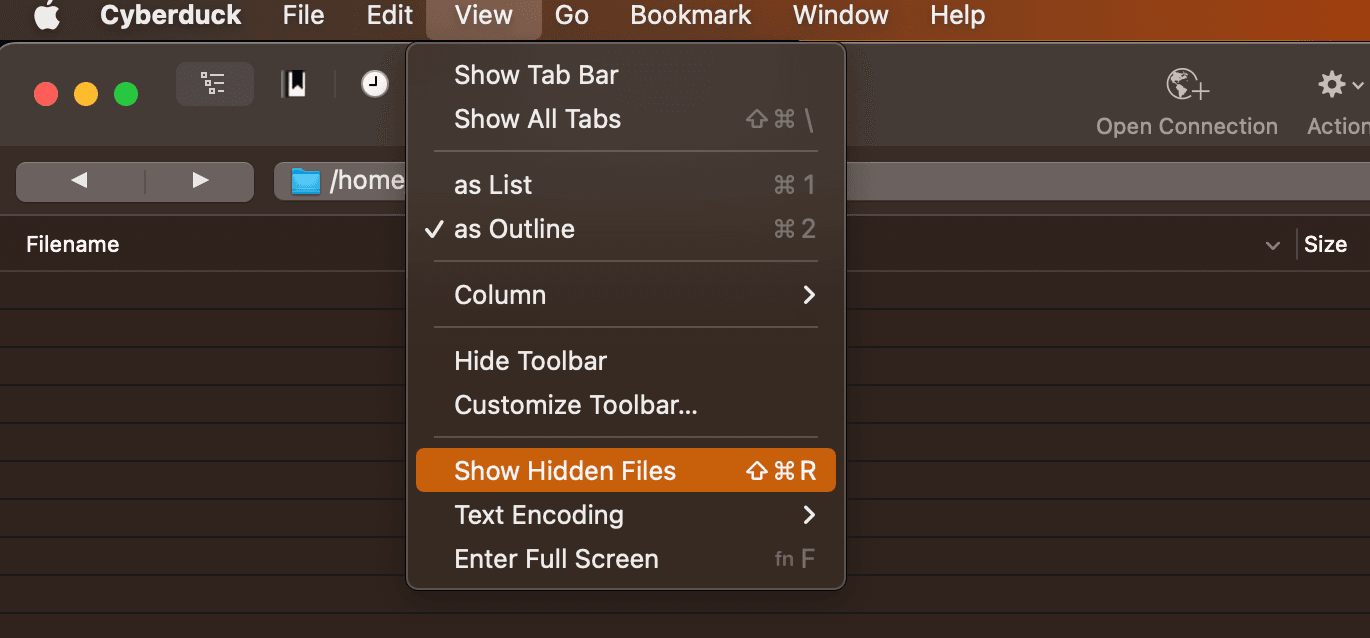
Files that start with a dot character "." are hidden files, therefore they will not be displayed by default in Cyberduck or any other SFTP client / File explorer, unless you specifically request it to do it.
In order to show hidden files, click on View > "Show Hidden Files":
Now the file we have created will be displayed as such:

We have successfully created our .env file on the EC2 Instance and you can always come back to this folder and edit it.
Nginx Configuration for Reverse Proxy to Port 3000
The last configuration step requires us to add some rules to Nginx, so that traffic coming into our server on port 80 (and 443, in a later section) is redirected to the process that is running on the server on port 3000.
We need to do this because we are not exposing port 3000, and because a browser will always, by default, use port 80 for HTTP requests, and port 443 for HTTPS requests.
In Leyman's terms, we need to make the Node.js Application work on port 80, without actually starting it with the environment variable PORT=80 (that's a story for another day).
We will the following succession of commands in which you will need to replace the server's IPv4 address with the one your server has.
Open a connection to the EC2 Instance using the Terminal, and then begin the following:
sudo rm -rf /etc/nginx/sites-available/default /etc/nginx/sites-enabled/defaultThen:
sudo nano /etc/nginx/sites-available/defaultYou may now paste in the following configuration:
server {
    server_name 3.65.136.108;

    listen 80;

    location / {
        proxy_pass http://127.0.0.1:3000;
        proxy_http_version 1.1;
        proxy_set_header Host      $host;
        proxy_set_header X-Real-IP $remote_addr;
    }
}
Then do "CTRL+X" (CTRL on Mac as well), then type "Y" and hit Enter - this will save our changes.
Then we will do:
sudo ln -s /etc/nginx/sites-available/default /etc/nginx/sites-enabled/defaultWe may now test our configuration by doing:
sudo nginx -tWhich should print:
ubuntu@ip-172-31-8-61:~$ sudo nginx -t
nginx: the configuration file /etc/nginx/nginx.conf syntax is ok
nginx: configuration file /etc/nginx/nginx.conf test is successful
Therefore we're now ready to reload Nginx and wrap up this section:
sudo service nginx restartAnd we're done! If you now type in the IPv4 in your browser and access it, you will receive a 502 Bad Gateway message, which is expected because our Node.js Application is not running yet.
In the next section we will boot up Express for the first time, and we will be able to use our application - almost there!
Launching our Node.js Application to Production:
We have completed all setup steps necessary to start our Node.js Application on the EC2 Instance.
As mentioned in the previous section, we will be using a slightly long command to start our application, which we will explain step by step.
The purpose of this is to give you the necessary tools in the future to build this setup for other applications as well, or to adjust it and improve it.
Open a Terminal, connect to the EC2 Instance and then run the following command:
cd /home/ubuntu/node-js-on-aws/ && npm i && cp ../environment-configuration/.env.backend .env && pm2 reload ecosystem.config.jsWhich will print the following:
ubuntu@ip-172-31-8-61:~$ cd /home/ubuntu/node-js-on-aws/ && npm i && cp ../environment-configuration/.env.backend .env && pm2 reload ecosystem.config.js

up to date, audited 280 packages in 1s

18 packages are looking for funding
  run `npm fund` for details

found 0 vulnerabilities
[PM2][WARN] Applications node-js-api not running, starting...
[PM2] App [node-js-api] launched (1 instances)
Which means that our Node.js Application is now running!
You may now open your browser, type in the IPv4 address of your EC2 Instance and you will be presented with the following default page:
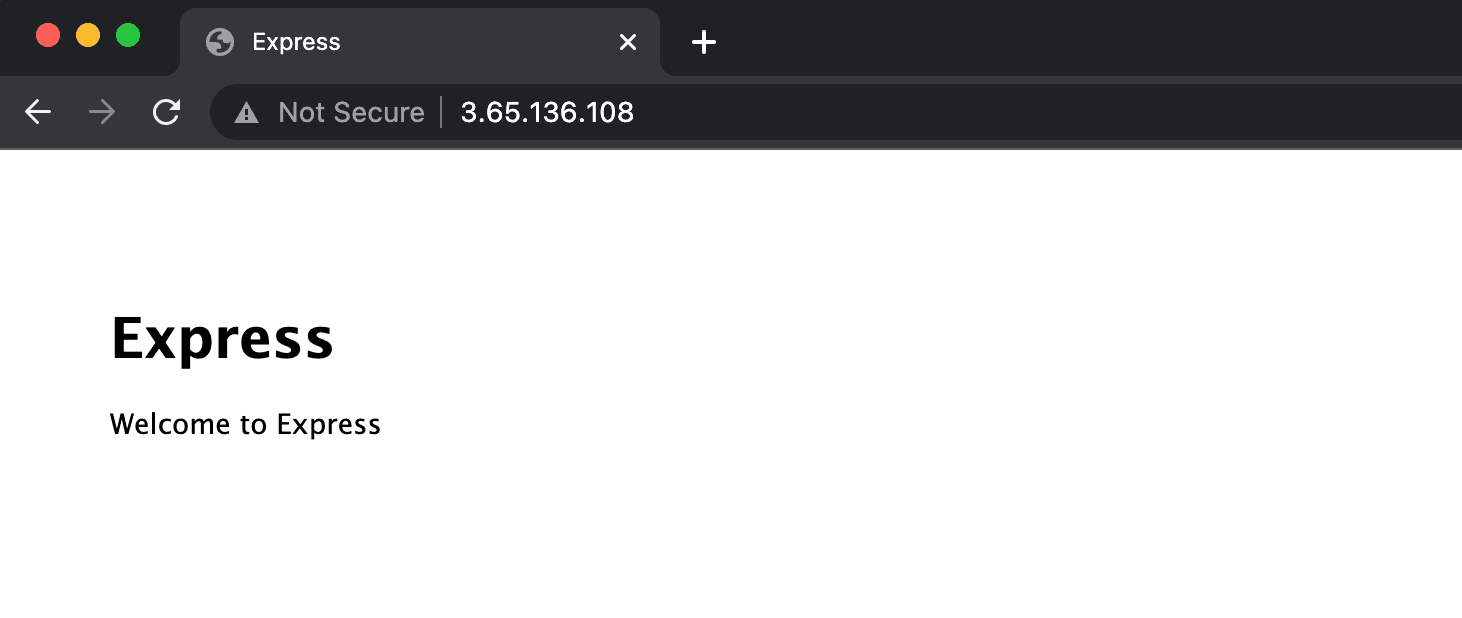
We have successfully launched our first Node.js Application on an EC2 Instance, and there are just a few more steps to take in order to make it Production-ready.
Last but not least, we promised an explanation for the command:
"&&" means "and" - it will allow you to write another command after it
"cd /home/ubuntu/node-js-on-aws/" - moves the active folder to the one specified after the word "cd"
"npm i" - in short, same as "npm install", but when you're installing new packages, you no longer need to also type "--save" to save them to package.json (we used it here just because it's short)
"cp ../environment-configuration/.env.backend .env" - will copy the first argument to the target specified by the second argument - this copies the .env.backend file we created with Cyberduck earlier into a new file called .env in the current folder, which in the scope of the command is the folder specified by "cd /home/ubuntu/node-js-on-aws/"
"pm2 reload ecosystem.config.js" - applies the configuration we defined in ecosystem.config.js
Preparing a Production-ready Node.js Application:
There are a few subject we will not cover in this section, but we will offer a few resources that will guide you through those steps:
Purchasing a Domain: Namecheap (Domain only, we will manage DNS Records elsewhere)
Managing your DNS Records: Cloudflare
(Optional) SSL Certificate: you may opt for a different Certificate Authority than Let's Encrypt
Once you have a Domain and it is active on Cloudflare, or another service that allows you to manage your DNS records, you will need to create:
Record type: A
Name: It may be "api", which will make it accessible at "api.<your-domain>.<com-or-another>"
Value: The IPv4 address of your EC2 Instance
In our case, we have created the following
Record type: A
Name: node-js-aws-tutorial
Value: 3.65.136.108
In Cloudflare you may need to adjust your SSL settings, our recommendation is to have it set to "Full", even "Full (strict)", if possible (but not mandatory).
We then need to adjust our Nginx configuration:
sudo nano /etc/nginx/sites-available/defaultAnd replace the server_name value with your newly added subdomain:
server {
    server_name node-js-aws-tutorial.proapplicationtech.com;

    listen 80;

    location / {
        proxy_pass http://127.0.0.1:3000;
        proxy_http_version 1.1;
        proxy_set_header Host      $host;
        proxy_set_header X-Real-IP $remote_addr;
    }
}
Save & Close, then run:
sudo service nginx restartAnd then your Node.js Application will be available on your subdomain, using HTTP.
Last but not least, we will add an SSL certificate using certbot. The following lines will be pasted from the following website, make sure to refer to it if you need to change the OS: https://certbot.eff.org/instructions?ws=nginx&os=ubuntufocal
Let's install certbot:
sudo snap install core; sudo snap refresh coreThen:
sudo snap install --classic certbotThen:
sudo ln -s /snap/bin/certbot /usr/bin/certbotAnd then to issue a certificate:
sudo certbot --nginxAnd then you may answer all prompts. This is what we did for our subdomain:
ubuntu@ip-172-31-8-61:~$ sudo certbot --nginx
Saving debug log to /var/log/letsencrypt/letsencrypt.log
Enter email address (used for urgent renewal and security notices)
 (Enter 'c' to cancel): [email protected]

- - - - - - - - - - - - - - - - - - - - - - - - - - - - - - - - - - - - - - - -
Please read the Terms of Service at
https://letsencrypt.org/documents/LE-SA-v1.3-September-21-2022.pdf. You must
agree in order to register with the ACME server. Do you agree?
- - - - - - - - - - - - - - - - - - - - - - - - - - - - - - - - - - - - - - - -
(Y)es/(N)o: Y

- - - - - - - - - - - - - - - - - - - - - - - - - - - - - - - - - - - - - - - -
Would you be willing, once your first certificate is successfully issued, to
share your email address with the Electronic Frontier Foundation, a founding
partner of the Let's Encrypt project and the non-profit organization that
develops Certbot? We'd like to send you email about our work encrypting the web,
EFF news, campaigns, and ways to support digital freedom.
- - - - - - - - - - - - - - - - - - - - - - - - - - - - - - - - - - - - - - - -
(Y)es/(N)o: Y
Account registered.

Which names would you like to activate HTTPS for?
We recommend selecting either all domains, or all domains in a VirtualHost/server block.
- - - - - - - - - - - - - - - - - - - - - - - - - - - - - - - - - - - - - - - -
1: node-js-aws-tutorial.proapplicationtech.com
- - - - - - - - - - - - - - - - - - - - - - - - - - - - - - - - - - - - - - - -
Select the appropriate numbers separated by commas and/or spaces, or leave input
blank to select all options shown (Enter 'c' to cancel): 1
Requesting a certificate for node-js-aws-tutorial.proapplicationtech.com

Successfully received certificate.
Certificate is saved at: /etc/letsencrypt/live/node-js-aws-tutorial.proapplicationtech.com/fullchain.pem
Key is saved at:         /etc/letsencrypt/live/node-js-aws-tutorial.proapplicationtech.com/privkey.pem
This certificate expires on 2023-04-01.
These files will be updated when the certificate renews.
Certbot has set up a scheduled task to automatically renew this certificate in the background.

Deploying certificate
Successfully deployed certificate for node-js-aws-tutorial.proapplicationtech.com to /etc/nginx/sites-enabled/default
Congratulations! You have successfully enabled HTTPS on https://node-js-aws-tutorial.proapplicationtech.com

- - - - - - - - - - - - - - - - - - - - - - - - - - - - - - - - - - - - - - - -
If you like Certbot, please consider supporting our work by:
 * Donating to ISRG / Let's Encrypt:   https://letsencrypt.org/donate
 * Donating to EFF:                    https://eff.org/donate-le
- - - - - - - - - - - - - - - - - - - - - - - - - - - - - - - - - - - - - - - -
And boom! we've just added HTTPS to our Node.js Application and made it ready for Production - you may now refresh the browser tab with your website, and you will be redirected to the HTTPS site.
HTTP traffic will automatically be redirected to HTTPS, which is the secure choice to deter MITM attacks.
Closing thoughts
In this article we have launched a Node.js Application to AWS EC2, a fairly simple and straight forward method of deploying a Backend Application in a Cloud environment.
This is our go-to type of deployment whenever we need to quickly spin up any sort of environment: Dev, Staging, Pre-prod and Production, given that you do not need complicated environment management strategies, file-system tricks or relying on hidden layers of networking or programs.
I hope that this guide will help you in the near future, and that you take everything you've learned here and improve it over time.